Find Tests, Surveys, and Pools
The Tests, Survey, and Pools tool is found under the Course Tools heading on the left side of your classic-style course site. Because the list is alphabetically sorted, it appears near the bottom.
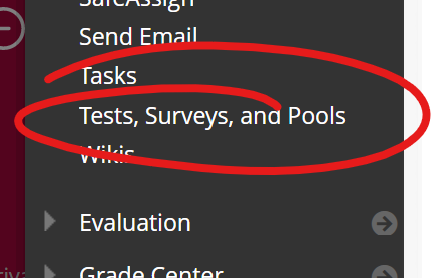
On the Tests, Surveys, and Pools page, click Tests to view, edit, or create tests, Surveys for surveys, and Pools for pools.
Note, while Blackboard does provide a survey tool, the Microsoft Office 365 tool Forms is often a better choice for surveys.

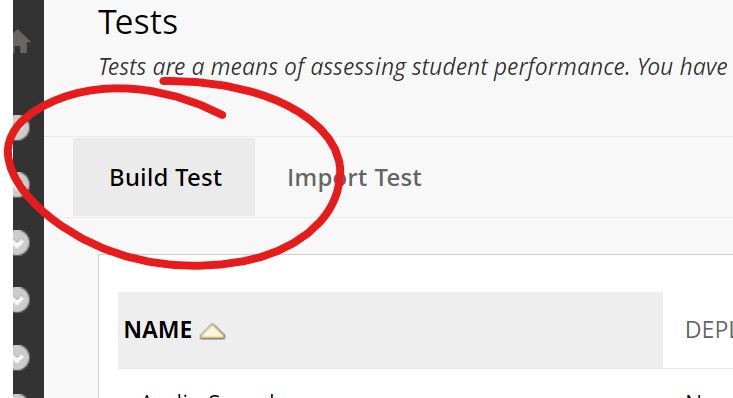
Create a New Test
From the Tests page, click the BUILD TEST button in the upper left.
On the Test Information page, enter at least a Name for your test in the appropriate field.
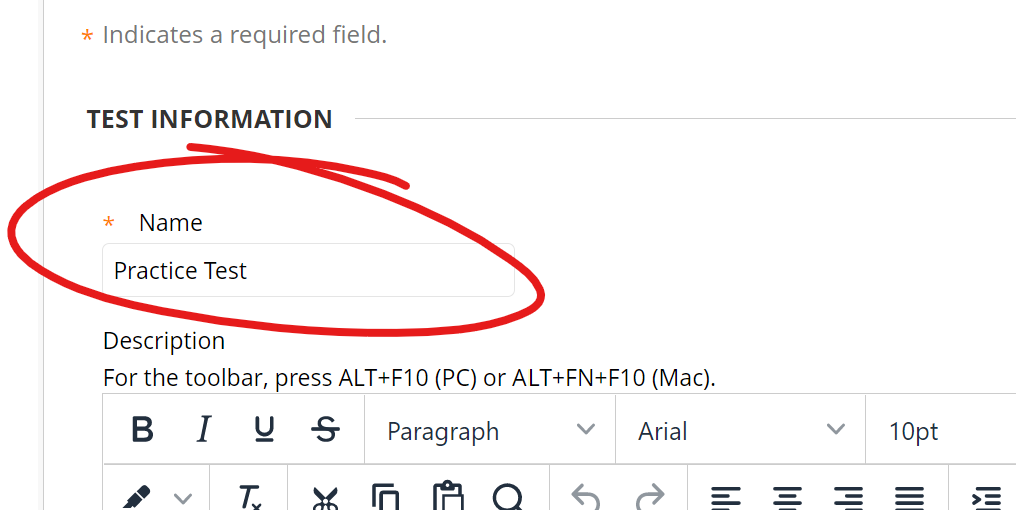
You may also enter a Description and Instructions for the test in the appropriate fields on this page.
The Description appears alongside the link to the test in the content area, and students can see this even if the test is not yet available. The Instructions for the test appear once the test is available and opened by students.
Submit.
Add Questions
The next screen is the Test Canvas. This is where you create new questions, find and use questions from other tests or pools, and apply settings such as point value.
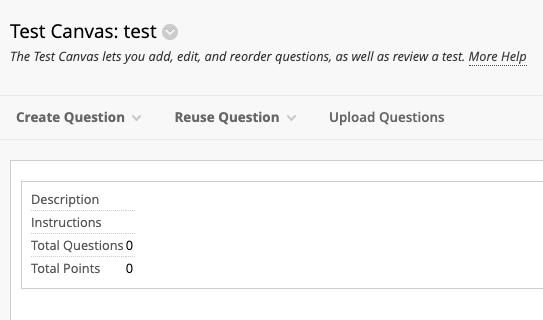
The basic task is to add a new question, which can be one of many question types. Click on Create Question to reveal the drop-down menu.
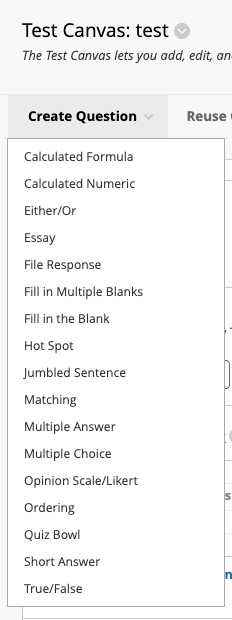
Once you choose your type (most common are multiple choice, short answer, and essay), you will be sent to a new screen to enter the question, possible answers (if applicable), and choose other settings based on the question type.
When finished, click either Submit and Create Another or Submit to return to the test canvas.

Once you have created all of your questions, be sure to choose OK at the bottom of the Test Canvas screen.
Note: This is does NOT release (aka deploy) the test to students. You must now finish the process by following the
Deploy a Test instructions.
Deploy a Test (Classic)
Once you have created a test, you must deploy it in order for students to complete it.
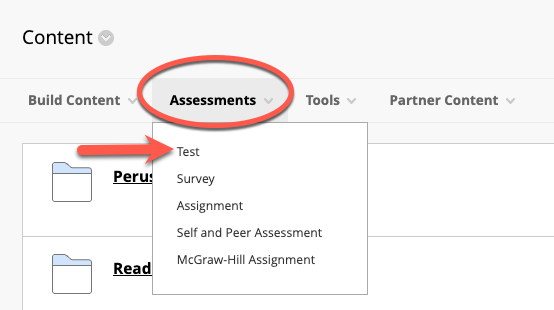
From your content area, within whichever folder you choose, click the button for Assessments to open the drop-down menu. Then choose Test.
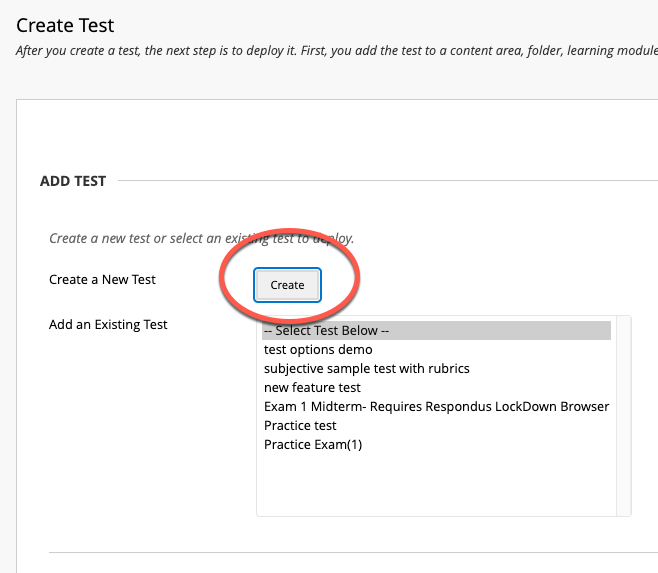
If you already have an existing test, you can choose from the menu it provides. (You can also use this as the starting point to create a new test.) Select the test you wish to deploy. Click submit.
You will now see the Test Options page. Apply your chosen settings (explained in more detail here on our Test Feedback Options, Test Availability Options, and Due Dates, Durations, and Availability pages). Click submit.
Test Availability Options
In a Classic style course, all the Test Availability options are grouped together on the test options page immediately after the Test Information section.
Make Available to Students

Choose YES on the "Make available to students" option if you want the test to be made available. If you plan to make the test available automatically using the Display After date and time, you'll need to select YES here as well (otherwise, all other options settings will be ignored). If you plan to manually turn the test on when you're ready for students to take it, choose NO.
Add a New Announcement
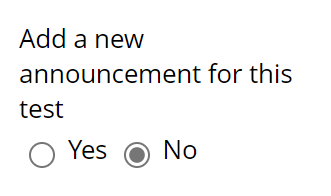
Choose YES on the "Add a new announcement for this test" option if you want Blackboard to automatically post a brief announcement when the test becomes available. The announcement will include only the test name, its location, and a course link to the test.
Multiple Attempts
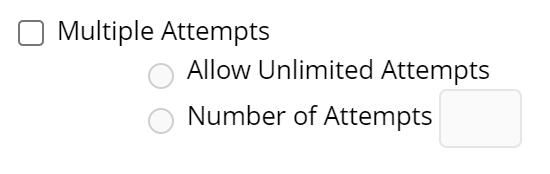
Check the Multiple Attempts box if you would like students to be able to submit the test more than once. When this box is checked you will be able to choose to give the students have unlimited attempts or a set number of attempts.
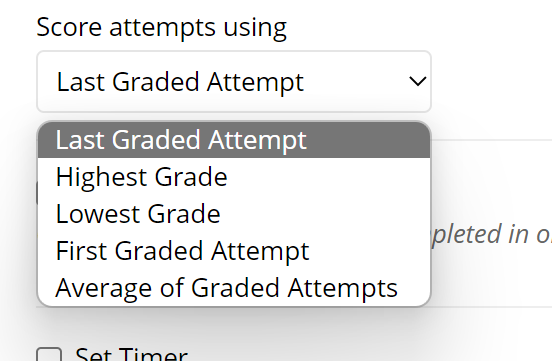
When this option is selected, you'll also need to decide how the Grade Center will handle scoring the attempt(s). You can choose to use the latest attempt, the highest grade, the lowest grade, the first attempt, or an average of all the graded attempts. You should be sure to let students know how you'll be handling multiple attempts.
Force Completion
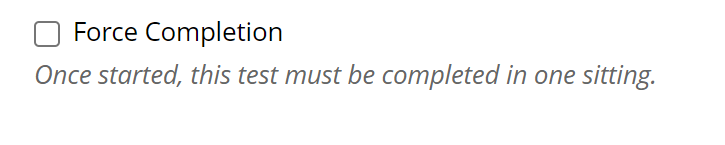
Check the Force Completion box if you want to set the test so that a student cannot exit and re-enter the test.
While this seems like an obvious choice for most exams, enabling force completion can make managing exams more complicated. Specifically, if a student loses access to a Force Completion exam (their internet connection drops, or their web browser freezes), they will not be able to get back in and pick up where they left off. The student will need to start the test over with a new attempt. If multiple attempts are not enabled, the instructor will need to use availability exceptions to give the student an additional attempt.
When Force Completion is turned off, students who get kicked out of a test will be able re-open their attempt and pick up where they left off.
Time Limit

Setting a time limit on the amount of time a student has to take an exam is useful for many reasons. Time limits help students set expectations about the test (consider a 20-question exam with a 10-minute time limit as compared to a 20-question exam with a 30-minute time limit), help reduce instances of cheating, and make it much easier to identify and set appropriate accommodations for students that need them.
The timer option lets you establish the expected completion time for the test. To apply a timer, check the Set Timer box and enter the number of minutes students have to complete the test. While taking the test, Blackboard will display a student's remaining time.
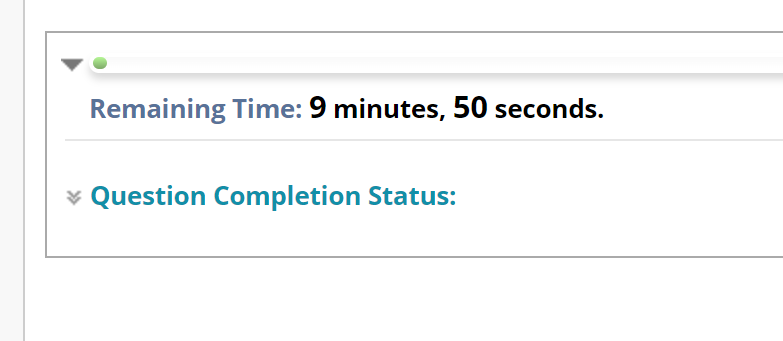
If Force Completion is not turned on -- meaning students can exit and re-enter the test -- you should be aware that the timer will continue to count down, even when a student is not in the exam. This means, if a test has a 30-minute time limit and a student begins the exam, closes it after 10 minutes, then re-opens the exam 15 minutes later, they will have 5 minutes remaining when they re-open the exam.
If you turn Auto-Submit on, the test will automatically save and submit when time expires.
If Auto-Submit is not turned on, students will be allowed to continue the test after the time limit is up. The test will not be automatically scored on submission, even if it consists entirely of self-scoring items (e.g., no essay or short answer questions). Instead, the over-time test will be marked "Needs Grading" (the "!" icon in the Grade Center).
For tests without Auto-Submit, you should let your students know in advance (ideally on the syllabus) how you will handle scoring over-time submissions. For example, you may want to take off points equal to one question at 30-seconds over time, three questions at the 1-minute mark, etc.
Availability Window
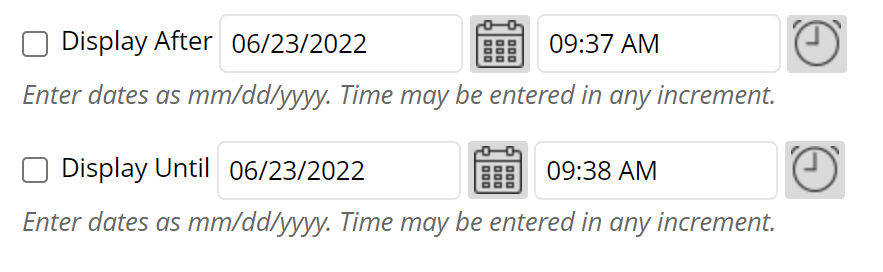
The Display After and Display Until fields let you set a window of time that a link to the test is visible to students in the content area.
This feature only works if "Make available to students" (above) is set to Yes.
Once the test is launched, the Display Until date and time will not factor into a student's attempt. Display Until does not deactivate or lock the exam in any way, it simply hides the test link from the students.
Please look at our page on Due Dates, Durations, and Availability for more information on how Time Limits interact with Availability Windows and Due Dates.
Password
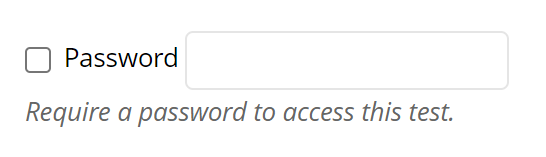
If you want to limit access to this exam to only students who have a password, check this box, and enter a password.
NOTE: When turned on for an exam, LockDown Browser enters a password into this field. Once you have required LockDown Browser for an exam, do not change the password and do not give the password out.
This password is what ensures students are taking the test using LockDown Browser. When a student launches LockDown Browser and launches the test, LockDown Browser invisibly passes this password off to Blackboard, letting the student into the exam.
If a student has this password, they will be able to access the test without using LockDown Browser.
If the password is changed or removed, LockDown Browser will be unable to launch the test.
If you want to require students use LockDown Browser and enter a password (a recommendation for live-proctoring), you should set the password in the LockDown Browser dashboard.
Restrict Location
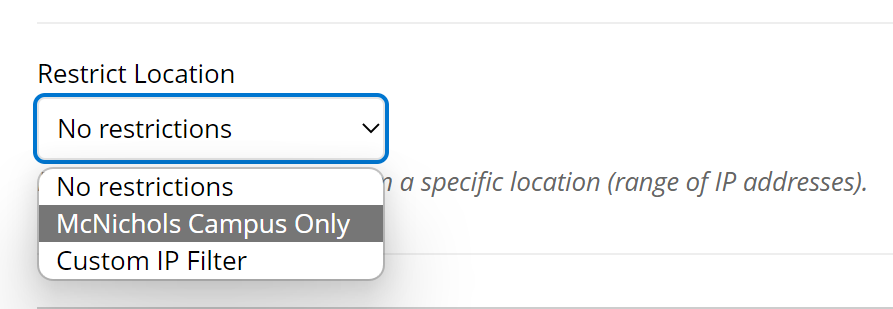
If you are using Blackboard to provide an exam that students will be taking on-campus, you can use the Restrict Location list to limit access to only students on the McNichols campus (other campus restrictions are not currently available).
Test Feedback Options
Test feedback options let you decide when students see feedback on their test and how much they see at any given point.
The Show Test Results and Feedback to Students section of the Test Options lets you set a maximum of two display windows for exams.
When
The WHEN column lets you choose when feedback will be released to students. You can set two windows for feedback release, for example providing a One-time View upon submission (first line), then opening the feedback up to students After Attempts are graded by choosing that option on the second line.
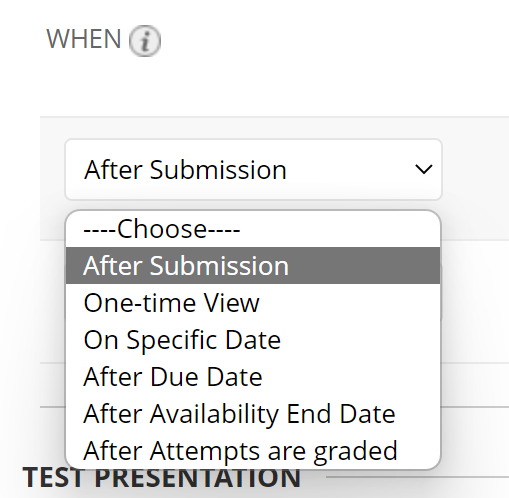
After Submission: This option is the default. Feedback is released to students from the moment they submit their assessment. If none of the following boxes are checked, students will only see their total score for the assessment. If you select "Choose" on the first row, it will default to "After Submission".
One-time View: After students submit their assessment, the selected results and feedback options are in effect for students to view ONCE. However, students can always view the scores they earned unless you hide the Grade Center column from students. Immediately after a student navigates away from the test or survey, any other results and feedback are restricted. You can change the setting or add another rule for a second viewing. A second rule cannot combined with the one-time view rule but is applied separately.
On Specific Date: View results and feedback after the selected date and time.
After Due Date: Feedback is available to students any time after the due date (which must be set on the test options page)
After Availability End Date: Feedback is available to students any time after the assessment is no longer available (which must be set on the test options page)
After Attempts are graded: After all students submit the assessment, and all attempts are graded (should questions require manual grading), results and feedback are released to students. If one or more students don't submit an attempt, you must assign those students a grade of 0 on the assessment to release feedback to the class.
If you set two feedback windows, the settings on the later window will override the settings on the earlier one. This means if set a test so ALL feedback is available after submission, but NO feedback is available on a specific date, then students will see all feedback until that specific date.
Score Per Question
If you check the Score Per Question box, students will see which questions they got right, which questions they got wrong, and which questions they received partial credit for. Remember, students always see their aggregate score (9/10 points possible). Score per question lets would let a student know they got question 2 wrong and all the rest right.

Answers
The answers checkboxes function as advertised ...

All Answers displays all of a question's available answer options
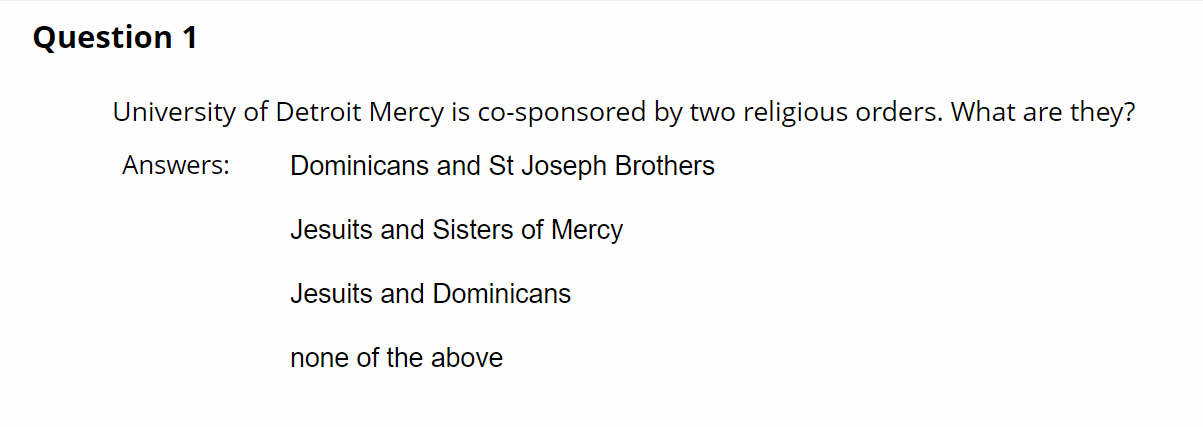
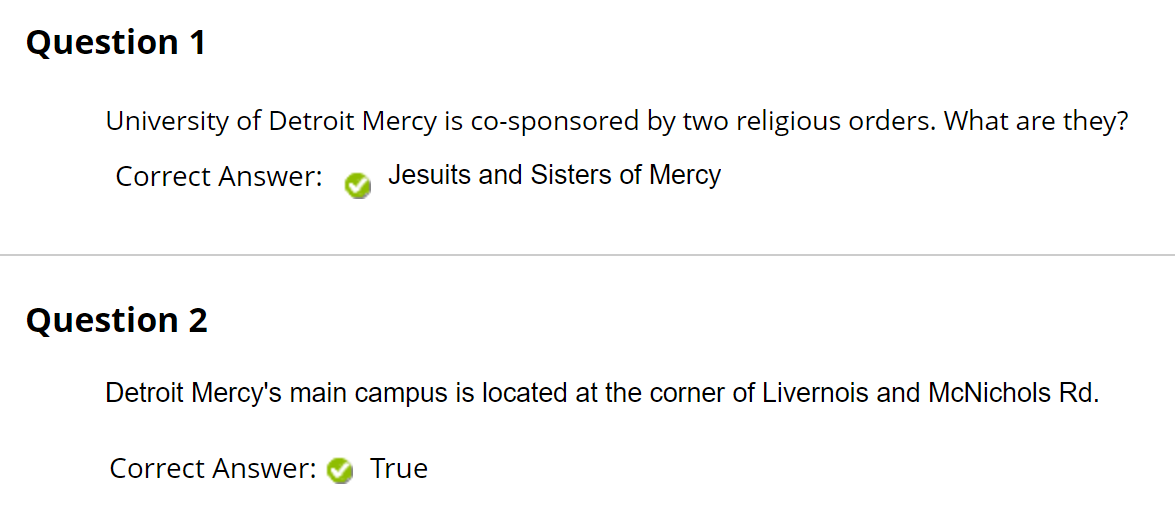
Correct displays the correct answer with a green check. When just this option is selected, there is no indication of whether the student answered the question correctly or not.
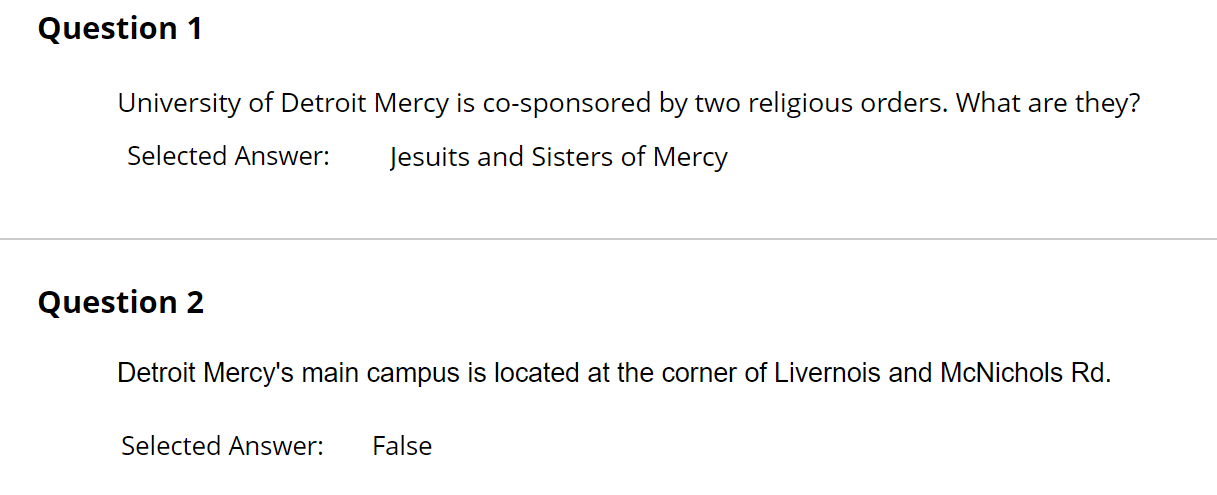
Submitted shows the student's selected answer and indicates whether it was correct or incorrect.
Feedback
If you entered feedback on the test, students will not see this feedback unless you check this box.
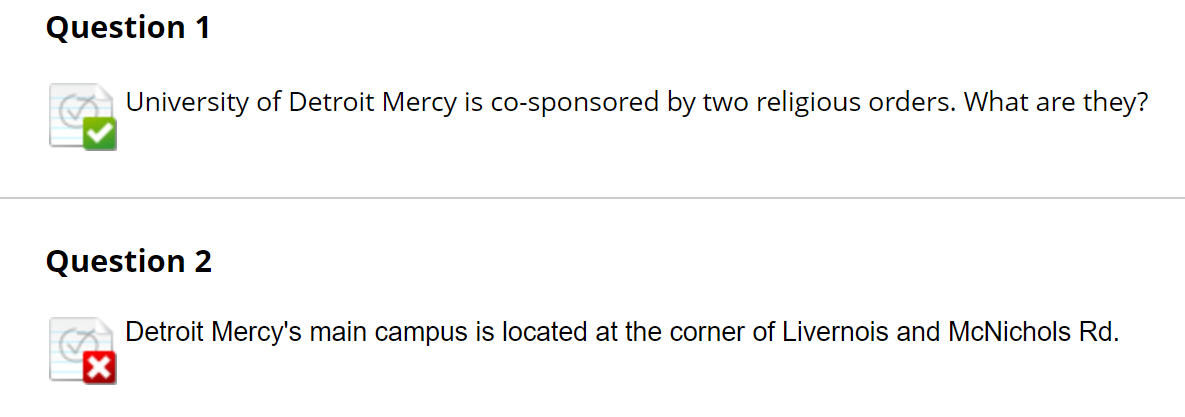
Show Incorrect Questions
When checked, students will see which questions they responded to correctly and incorrectly, but no further information will be displayed (unless selected).
Combining Feedback Options
Selecting multiple feedback options adds those feedback options to the display. For example, if checking "Correct" and "Submitted", students will see both those options together.
Changing Feedback Options
If you edit these feedback options after the assessment, feedback will be released (or restricted) based on the new options. This means if you prefer, you can manually edit the "After Submission" feedback to include display of the students' submitted answers at some point after the exam submission, rather than using the second "When" row to set an additional feedback window.