The Media Library (YuJa) is the preferred way to provide students with pre-recorded video. It can also be used by students to share video, either in online discussion or assignment submission. This walkthrough shows how to locate the Media Library, add media items to the library OR record new video using the browser, and then publish those videos to a course (also known as a channel in Yuja).
Find Media Library [YuJa] Link
The Media Library is the starting point for managing your media collection on YuJa. You can use this page to upload and create media, view comments and analytics, and add videos to course-based channels.
When faculty access their Media Library from a link inside a course, they'll be presented with their media collection. When students access the media library from inside a course, they'll be presented with the course's media channel -- a list of videos published to the course channel by the instructor.
Access the Media Library by clicking Tools in the course menu.
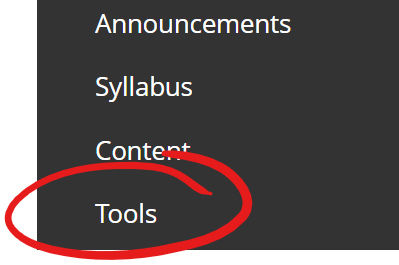
Then choose Media Library [YuJa] from the alphabetically sorted Tools list
![Media Library [YuJa] item highlighted in tools list](http://cetl.udmercy.edu/knowledge/fileman_data/uploads/support/add-and-organize-content/media-library-yuja/find-media-library-yuja-link/image-20221116125559-1.png)
Record Video in Browser
YuJa's Browser Capture Studio is a simple, quick solution for those who do not need to install the feature-rich desktop application, or who are working on a rights-controlled machine that will not let them install software.
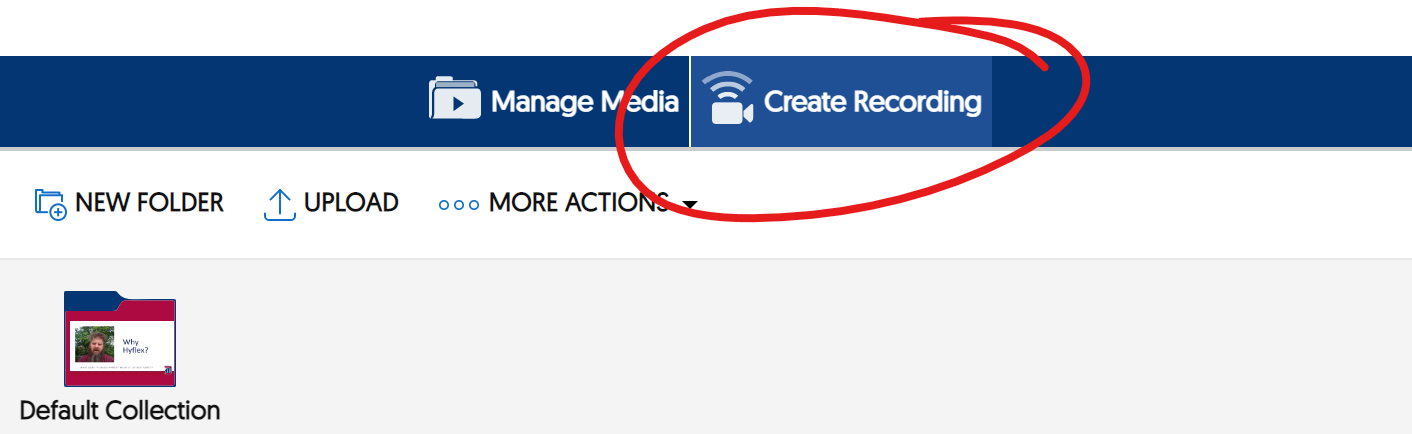
From the YuJa Media Library, click the Create Recording button in the top-center of the screen.
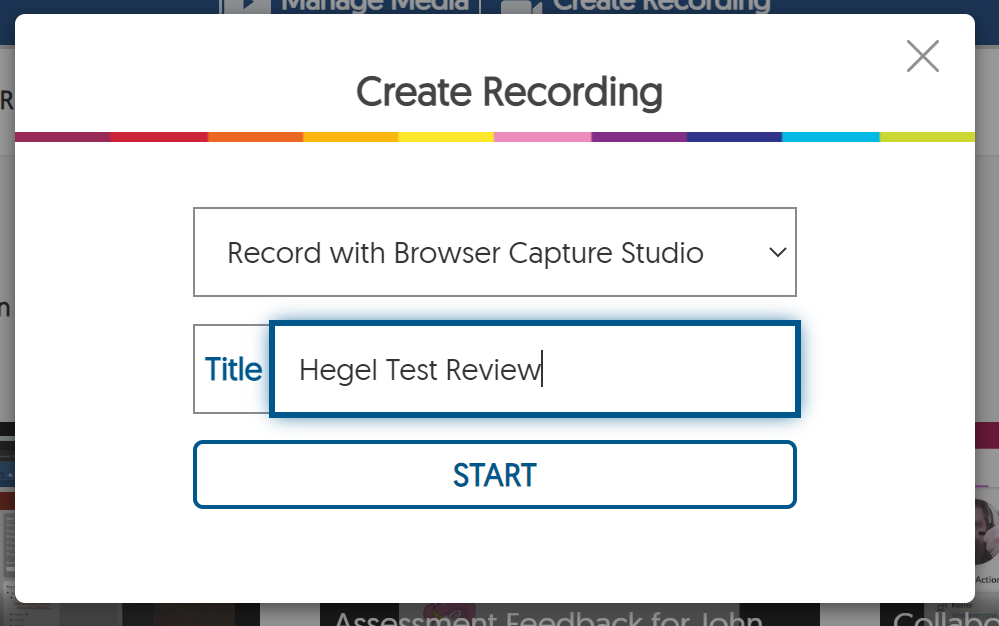
On the Create Recording window, select Record with Browser Capture Studio from the pulldown list.
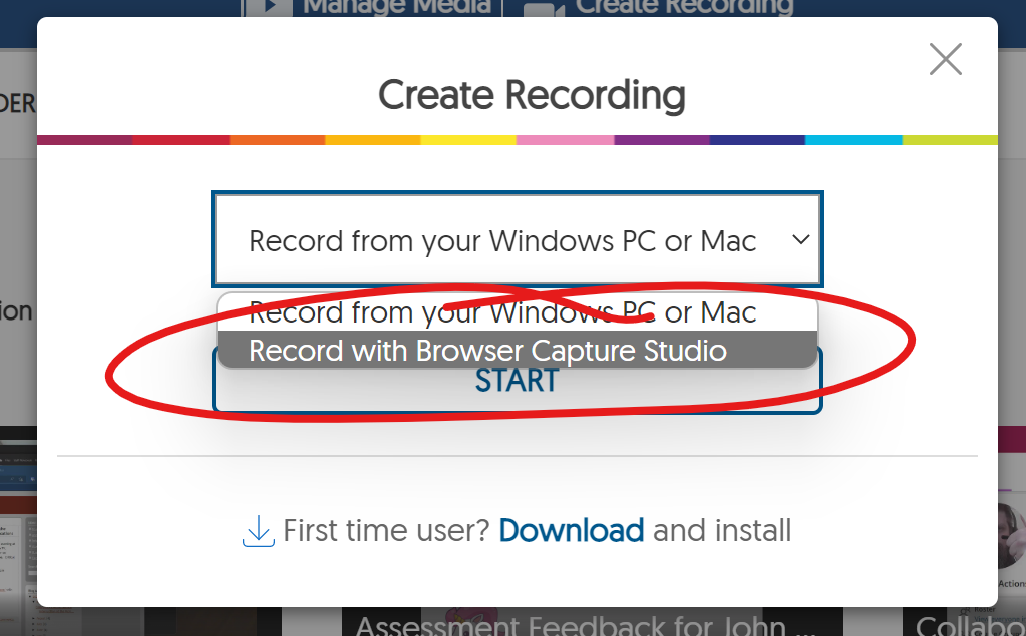
Enter the Title for your recording in the space that appears, then click START to launch the browser recording studio.
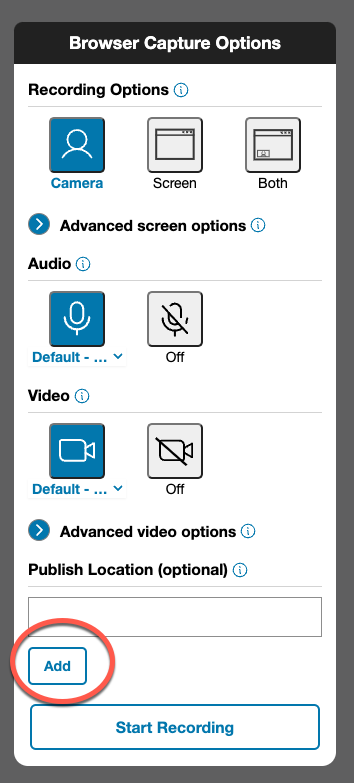
In the Recording Options section, choose whether you'd like to record your camera, your screen, or both.

If you include Screen in your recording options, you'll be prompted to select a source for your screen recording. If you're unfamiliar with selecting a share source, this page outlines how this works in Chrome, Edge, and Firefox.
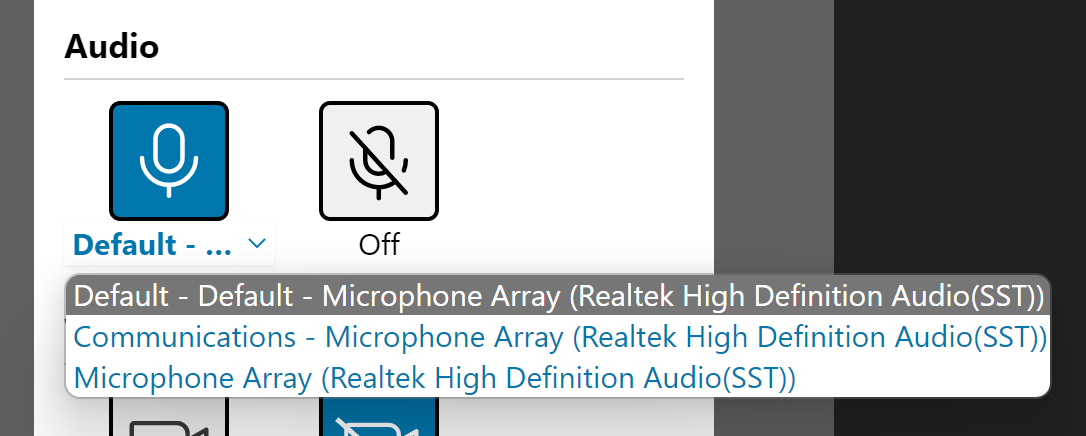
Choose whether or not you want to include audio recording.
If you have more than one microphone available (for example, if you are wearing a headset and want to make sure the headset microphone is selected), click the "Default - " pulldown beneath the microphone icon and select an appropriate microphone.
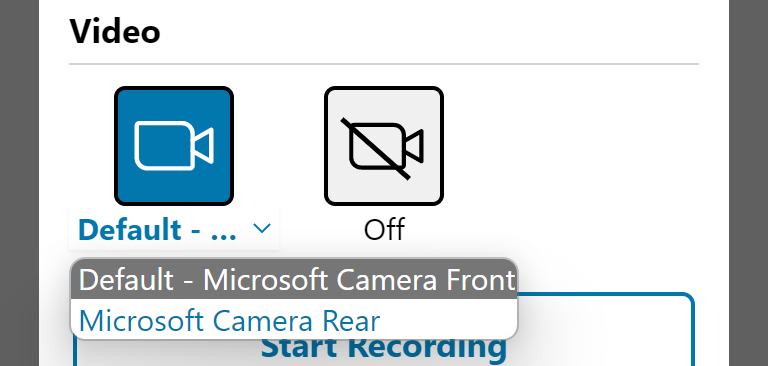
Similarly, under Video choose whether to turn on your camera, and choose the camera you want to use (if necessary) from pull-down menu beneath the camera button.
Note: If you select Camera or Both under Recording Options, the video will be turned on. If you turn the camera off, your recording options will change to reflect the fact that you've disabled the camera.
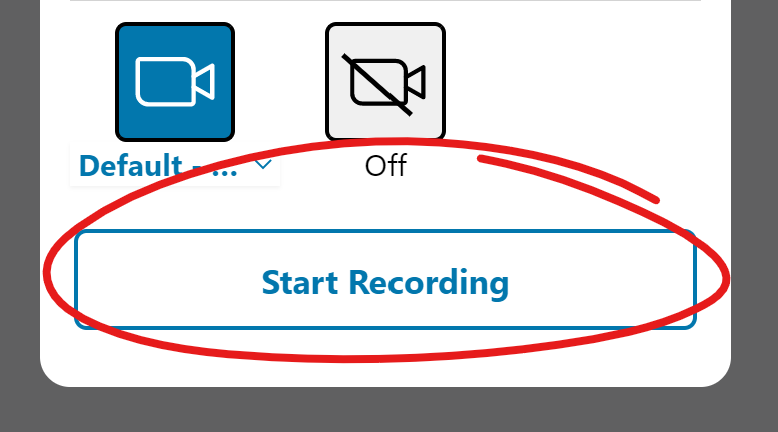
Press Start Recording at the bottom of the Browser Capture Options box to start your recording.
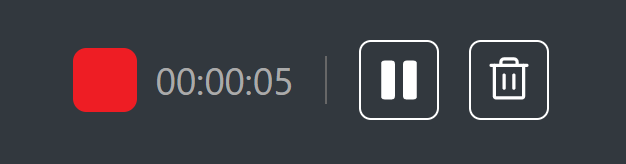
To finish your recording, click the red square left of the recording time counter.
To pause your recording, click the pause button right of the time counter.
To delete your recording, click the trash can icon (you will get an "Are you sure you want to delete this" confirmation prompt).
You can then preview the recording (click PLAY on the preview player) and choose to upload or discard the video. Choose UPLOAD to add the video to your media library.

Once you choose UPLOAD the video will take a few minutes (depending on length) to finalize before you can edit the video, if necessary, or embed the video in a course site.
Publish Current Recording to Course Channel
While the ideal use of Media Library [Yuja] is to share individual media (such as videos) with a course by using the textbox and media chooser functions, you can also publish videos to a course (aka channel) and users would access them as a whole. Think of this use as a repository for media.
When recording with Browser Capture Studio
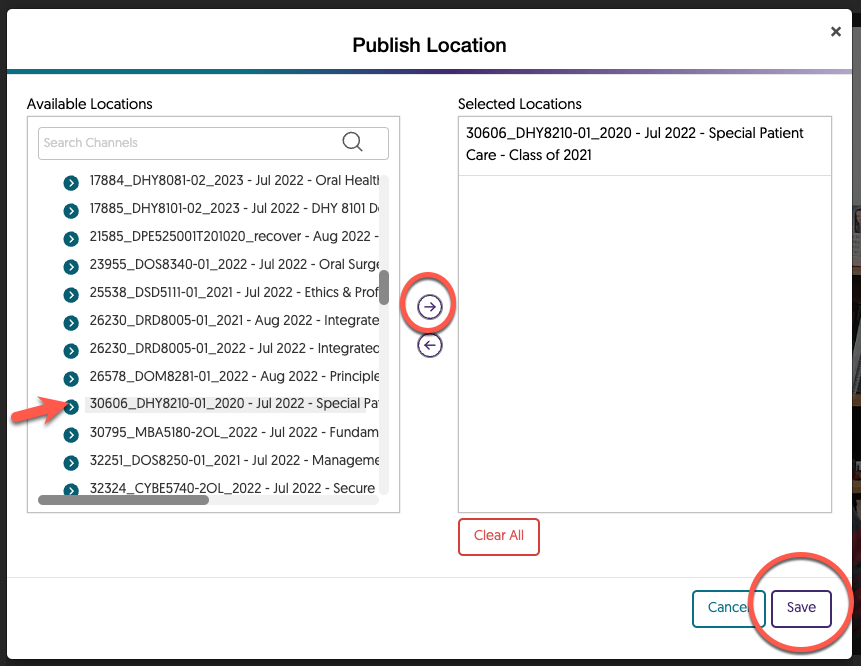
To the left of the recording camera image, there is a list of options. Click Add.
A popup window should appear, with a list of your available locations (in other words, courses you've linked to Yuja). Select the course or courses you wish to publish to. Click the arrow which is pointing to the right. Those selected courses should now appear in the right box. Choose Save.
You may now complete your recording.
When recording with Yuja's Desktop Software Capture
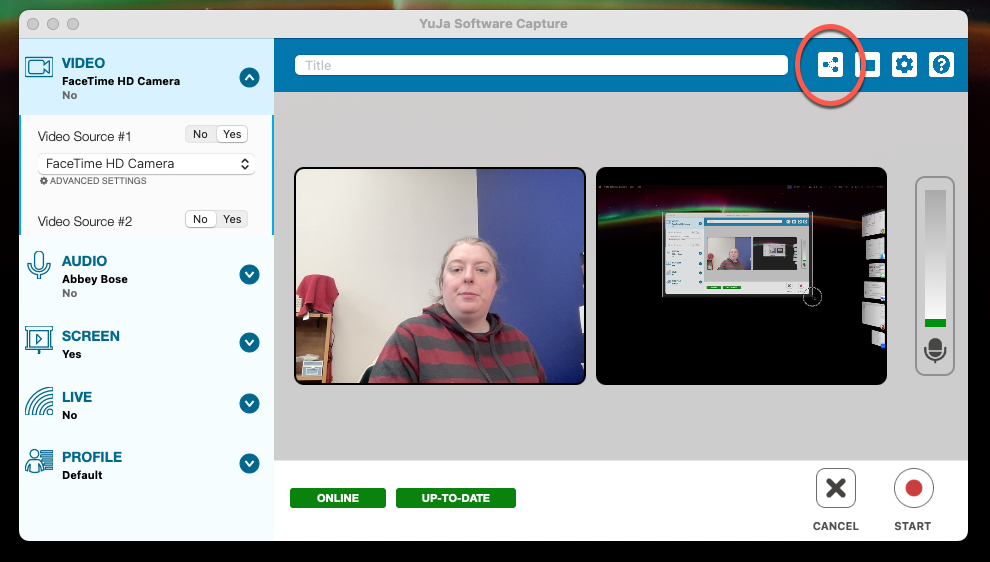
Above the recording camera image, there is a set of icons. Select the share/link icon. 
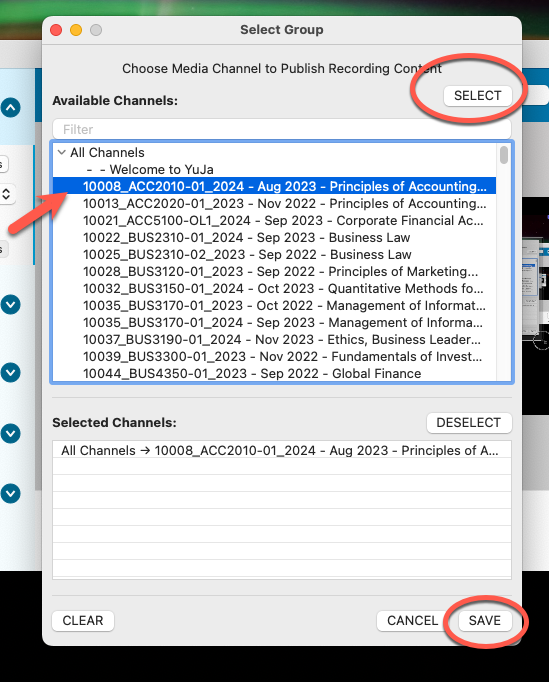
A popup window should appear, with a list of your available channels (in other words, courses you've linked to Yuja). Select the course or courses (aka channels) you wish to publish to simply by clicking them. Click the select button at the top right. Those selected courses should now appear in the bottom box. Choose Save.
You may now complete your recording.
The Media Library (YuJa) is the preferred way to provide students with pre-recorded video. It can also be used by students to share video, either in online discussion or assignment submission. This walkthrough shows how to locate the Media Library, add media items to the library OR record new video using the browser, and then publish those videos to a course (also known as a channel in Yuja).
Find Media Library [YuJa] Link
The Media Library is the starting point for managing your media collection on YuJa. You can use this page to upload and create media, view comments and analytics, and add videos to course-based channels.
When faculty access their Media Library from a link inside a course, they'll be presented with their media collection. When students access the media library from inside a course, they'll be presented with the course's media channel -- a list of videos published to the course channel by the instructor.
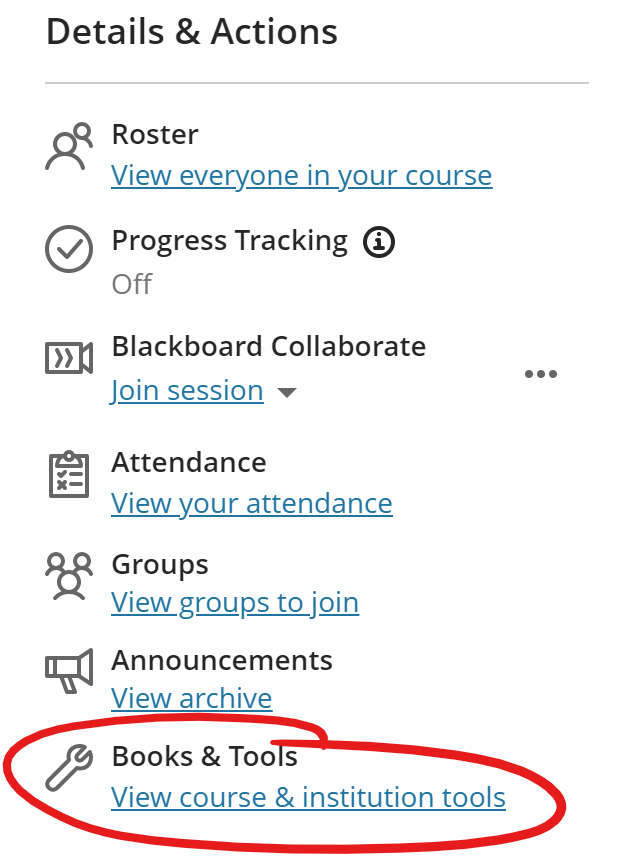
To access the Media Library, locate the Details & Actions menu (on the left or at top of the Course Content page, depending on the width of your screen). Choose "View course & institution tools" under Books & Tools.
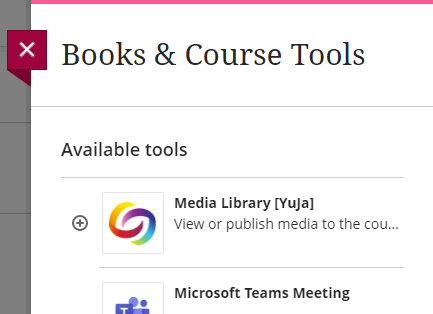
Select Media Library [YuJa] from the Available Tools list.
Record Video in Browser
YuJa's Browser Capture Studio is a simple, quick solution for those who do not need to install the feature-rich desktop application, or who are working on a rights-controlled machine that will not let them install software.
From the YuJa Media Library, click the Create Recording button in the top-center of the screen.
On the Create Recording window, select Record with Browser Capture Studio from the pulldown list.
Enter the Title for your recording in the space that appears, then click START to launch the browser recording studio.
In the Recording Options section, choose whether you'd like to record your camera, your screen, or both.
If you include Screen in your recording options, you'll be prompted to select a source for your screen recording. If you're unfamiliar with selecting a share source, this page outlines how this works in Chrome, Edge, and Firefox.
Choose whether or not you want to include audio recording.
If you have more than one microphone available (for example, if you are wearing a headset and want to make sure the headset microphone is selected), click the "Default - " pulldown beneath the microphone icon and select an appropriate microphone.
Similarly, under Video choose whether to turn on your camera, and choose the camera you want to use (if necessary) from pull-down menu beneath the camera button.
Note: If you select Camera or Both under Recording Options, the video will be turned on. If you turn the camera off, your recording options will change to reflect the fact that you've disabled the camera.
Press Start Recording at the bottom of the Browser Capture Options box to start your recording.
To finish your recording, click the red square left of the recording time counter.
To pause your recording, click the pause button right of the time counter.
To delete your recording, click the trash can icon (you will get an "Are you sure you want to delete this" confirmation prompt).
You can then preview the recording (click PLAY on the preview player) and choose to upload or discard the video. Choose UPLOAD to add the video to your media library.
Once you choose UPLOAD the video will take a few minutes (depending on length) to finalize before you can edit the video, if necessary, or embed the video in a course site.
Publish Current Recording to Course Channel
While the ideal use of Media Library [Yuja] is to share individual media (such as videos) with a course by using the textbox and media chooser functions, you can also publish videos to a course (aka channel) and users would access them as a whole. Think of this use as a repository for media.
When recording with Browser Capture Studio
To the left of the recording camera image, there is a list of options. Click Add.
A popup window should appear, with a list of your available locations (in other words, courses you've linked to Yuja). Select the course or courses you wish to publish to. Click the arrow which is pointing to the right. Those selected courses should now appear in the right box. Choose Save.
You may now complete your recording.
When recording with Yuja's Desktop Software Capture
Above the recording camera image, there is a set of icons. Select the share/link icon.
A popup window should appear, with a list of your available channels (in other words, courses you've linked to Yuja). Select the course or courses (aka channels) you wish to publish to simply by clicking them. Click the select button at the top right. Those selected courses should now appear in the bottom box. Choose Save.
You may now complete your recording.