Here we look at the full process of creating a rubric in your Blackboard course site, applying it to an assessment, and using the rubric for both scoring and student feedback.
Create a Rubric
There are two ways to initiate creation of a rubric, though they have the same following steps.
Create a new rubric without an associated gradable item.
In the left-hand black course menu bar, expand Control Panel then Course Tools. Choose Rubrics.
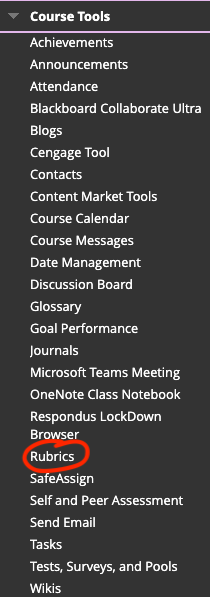
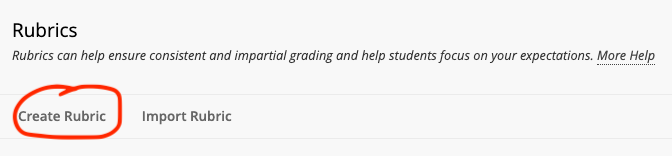
Click the Create Rubric Button
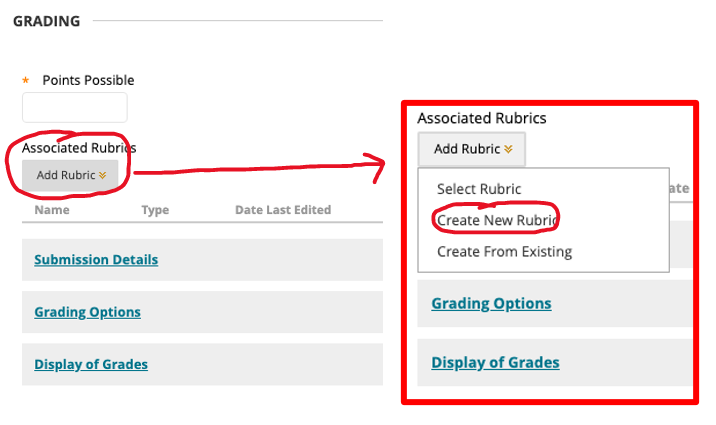
Create a new rubric from within an associated gradable item.
While you create an assignment, subjective test questions, discussion forums, wikis, blogs and journals, and grade center columns you can create a rubric.
Under the Grading heading, there is a gray box which says Add Rubric. Hover over that box and choose Create New Rubric.
The rest of the steps are the same for each method
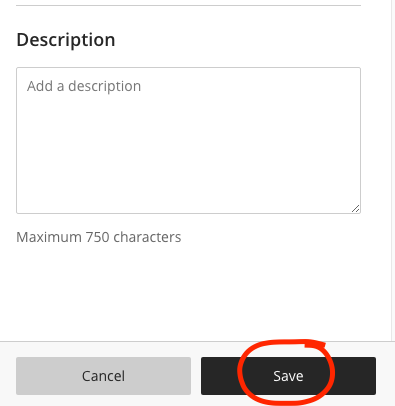
Name your rubric in a descriptive way so you will be able to find it again in the future. You may also include a description for further identification.
There are default titles for the default three rows (criteria) and three columns (levels of achievement). These are all customizable (see article Edit Rubric Level Headings).
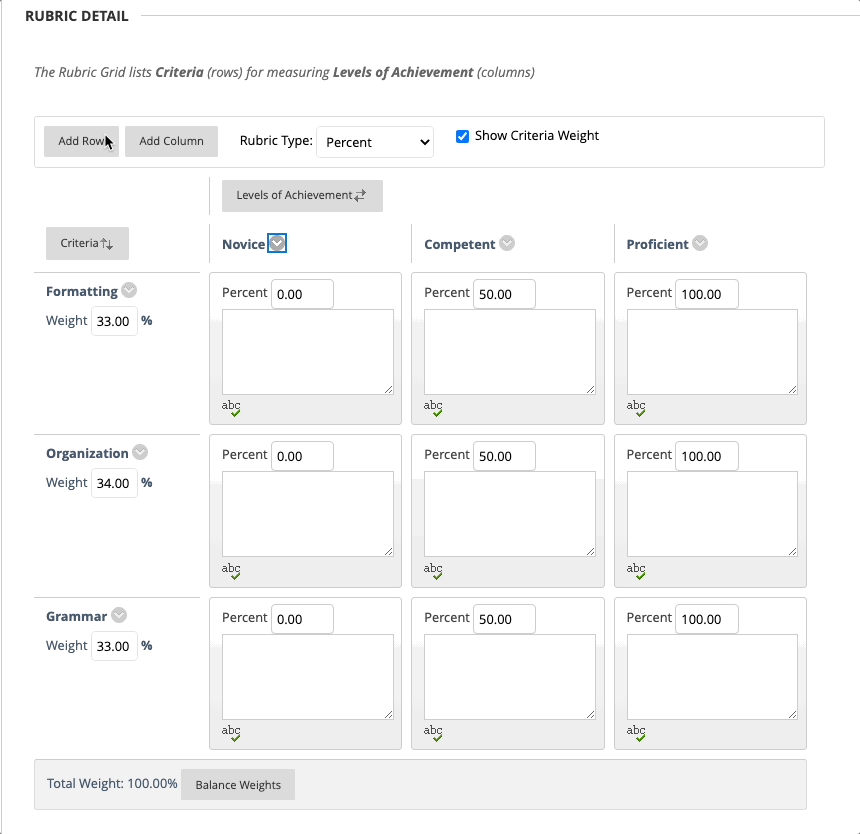
Add rows (Criteria) or columns (Levels of Achievement) as needed.
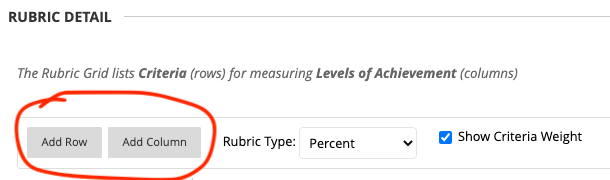
Turn on or off Criteria Weights.

Enter your criterion descriptions. It is useful to include details here in order to support student understanding and success as well as grading consistency.

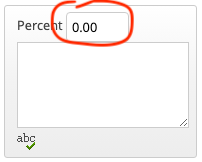
Enter your points or percentages (see article on these Rubric Types).
Be sure to click Submit to save your work.
Associate a Rubric with a Gradable Item
Once you have created a rubric, you can associate it with as many gradable items as you wish. You can do this the first time you create the gradable item or you can add it later by editing the item.
Within the assignment (creating it or editing it), under the Grading heading, there is a gray box which says Add Rubric. Hover over that box and choose Select Rubric.
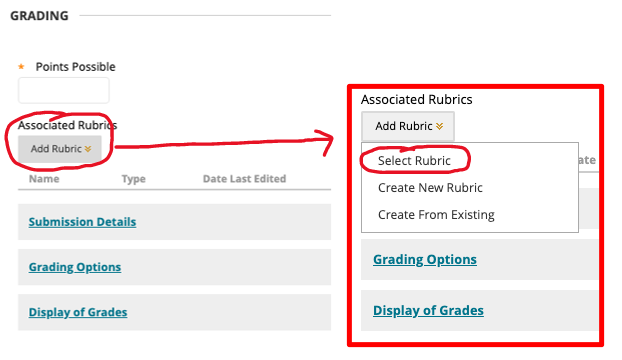
This will open a pop-out window showing all of your rubrics saved within the course.
You can preview the contents of each rubric before you select one.
Once you’ve chosen, check the box next to the rubric title.
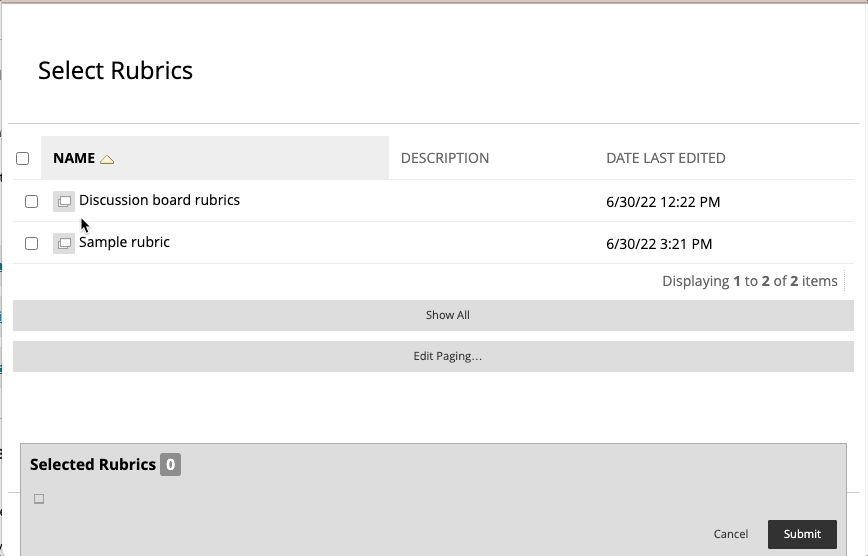
Click Submit.
That rubric is now connected to your assignment, discussion forum, wiki, blog, or journal.
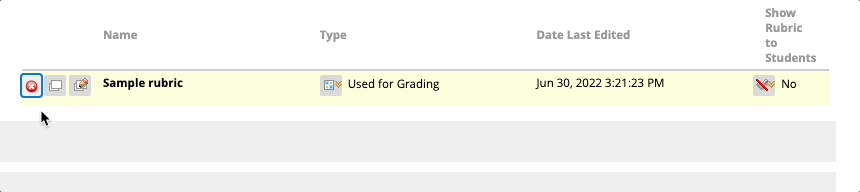
Note: When a rubric is connected to a gradable item it is by default hidden from student visibility. We strongly suggest making your rubrics always visible to your students.
Additional options (see other articles about these items):
• Detach the rubric from this item (it will not delete it from the course as a whole).
• Preview the rubric again.
• Edit the rubric.
• Change the student visibility of the rubric. We suggest keeping the rubric visible to students at all times.
Be sure to click Submit to save your work.
Change Rubric Visibility
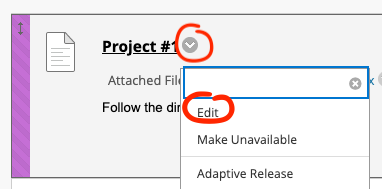
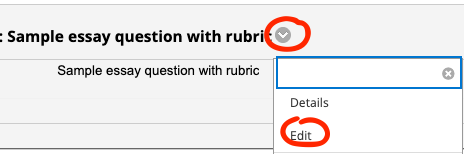
When a rubric is connected to a gradable item it is by default hidden from student visibility. From within an assignment, subjective test questions, discussion forums, wikis, blogs and journals, and grade center columns you can change the visibility of the rubric which is associated with that content.
Note: We strongly suggest making your rubrics always visible to your students.
From inside the Edit Assignment (or Edit Question, etc) and under the Grading heading, you should see any attached rubrics highlighted in yellow.
| Assignment window |
Test Question window |
 |
 |
There is a button to the far right of the yellow highlighted rubric.
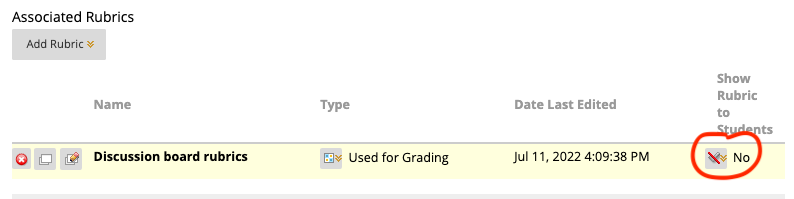
Hover over it. You will see three options:
1. Yes (with rubric scores)
2. Yes (without rubric scores)
3. After Grading
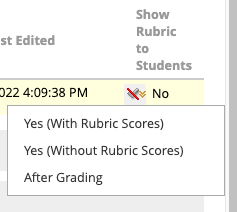
Make your choice and click it.
Be sure to click Submit to save your work.
Edit Rubric
Just as there are two ways to initiate creation of a rubric, there are two ways to edit rubrics.
Note: changes you make to a rubric will be reflected everywhere that rubric is used. You CANNOT, however, change a rubric which has already been used to grade a submission.
Edit a rubric without an associated gradable item
In the left-hand black course menu bar, expand Control Panel then Course Tools. Choose Rubrics.

Find the rubric you want to edit. Next to the rubric, click the gray arrow and Edit.
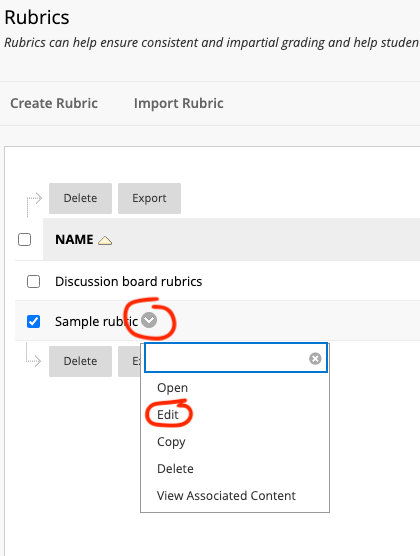
Make your changes. Be sure to click Submit to save your work.
Edit a new rubric from within an associated gradable item.
From within an assignment, subjective test questions, discussion forums, wikis, blogs and journals, and grade center columns you can edit the rubric which is associated with that content.
From inside the Edit Assignment (or Edit Question, etc) and under the Grading heading, you should see any attached rubrics.
There is an edit button just to the left of the name of the rubric. Click it.
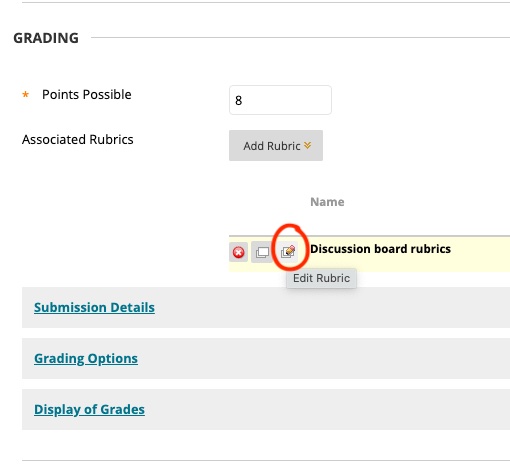
This will open a pop-out window where you can edit your rubric.
Make your changes. Be sure to click Submit to save your work.
Grade Assignment with a Rubric
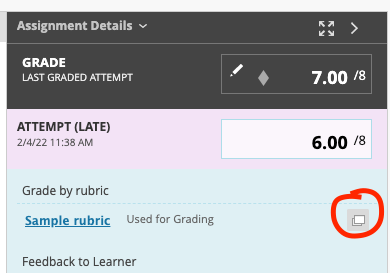
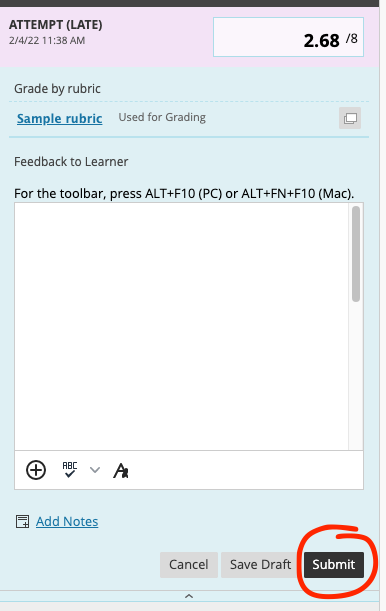
From within the Grade Assignment window, expand the blue bar below the purple ATTEMPT area.
Open the associated rubric one of two ways. Click the blue link with the name of the rubric or click the small gray and white window-in-window button. Each way offers the same options.
Blue link method: will reveal the rubric rows and columns in the same window.
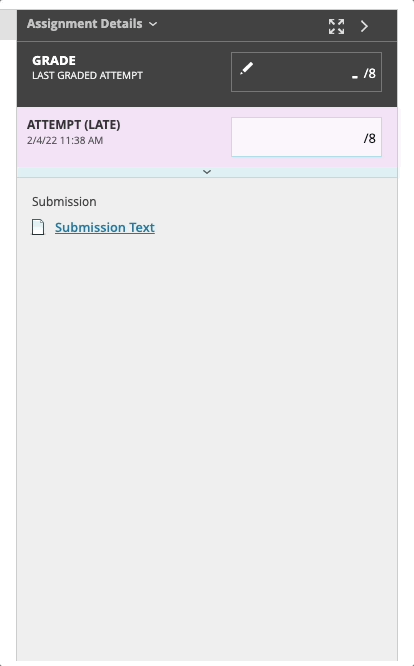
The small gray and white button method: will open the rubric in a new pop-out window.
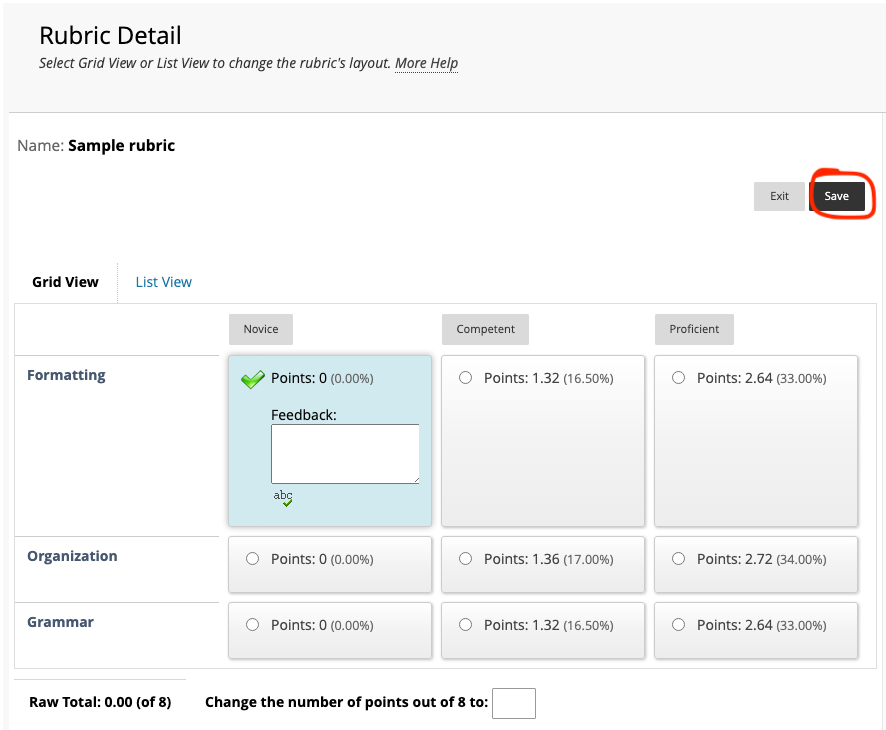
Be sure to save your changes in this window. Once you do, it will return you to the blue rubric.
The remaining steps are the same for each method
Based on your parameters and what you feel the student has achieved, choose the achievement level for each criterion by clicking the radial button to the left of each option or manually entering the percentage. (You MUST choose an achievement level for each criterion, even if it is zero, in order for the rubric to save.)
Scores will calculate automatically.
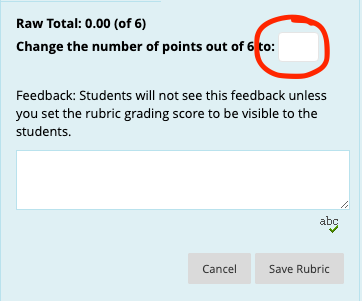
Once you have scored all criteria, you will have the option to adjust the student’s score. If you want to use the raw (system-calculated) total, you can leave this box blank.
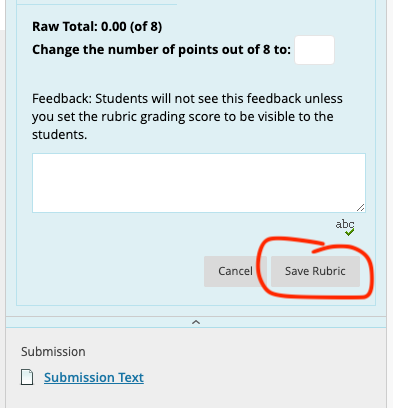
Be sure to click the Save Rubric button AND THEN the Submit button before leaving that student’s submission.
Here we look at the full process of creating a rubric in your Blackboard course site, applying it to an assessment, and using the rubric for both scoring and student feedback.
Create a Rubric
There are two ways to initiate creation of a rubric, though they have the same following steps.
Create a new rubric without an associated gradable item.
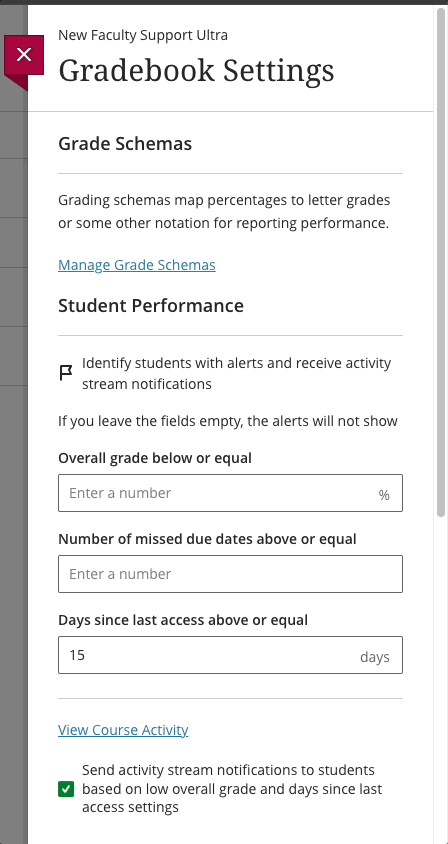
From the Gradebook screen, access the settings by clicking the gear icon in the upper right.
Scroll all the way down and click the either the Create button to create a new rubric from scratch or the Generate button to use Ai to get you started.
Create a new rubric from within an associated gradable item.
While you create an assignment, test with no questions, or discussion, you can create a rubric. Access the settings (Assignment, Test, or Discussion) by clicking the gear icon in the upper right.

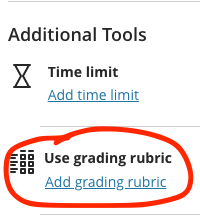
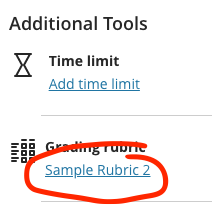
Scroll almost all the way down to Additional Tools. Click Add grading rubric.
Here you will be given the option to Create New Rubric (gray button) or Add a previously created rubric (see our other article on Associating Rubrics).

The rest of the steps are the same for each method
- Name your rubric in a descriptive way so you will be able to find it again in the future.
- Choose your rubric type from the drop down menu at the top (see the other article on Rubric Types).
- There are default titles for the default four rows (criteria) and four columns (levels of achievement). These are all customizable by clicking the pencil icon next to the title (see below).
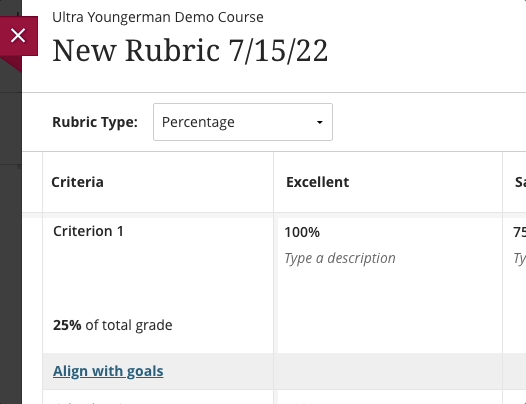
- Add rows or columns as needed by hovering over the lines between rows or columns.
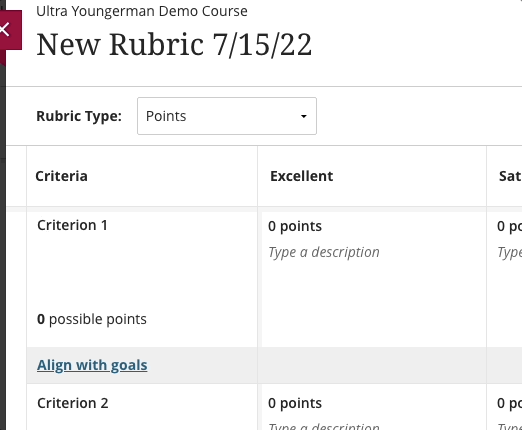
- Enter your criterion descriptions. It is useful to include details here in order to support student understanding and success as well as grading consistency.
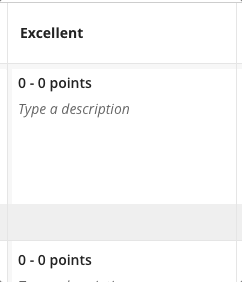
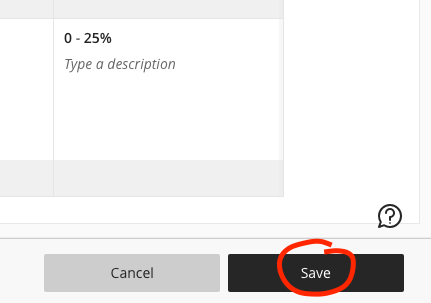
- Enter your points or percentages (see article on these Rubric Types).
Be sure to click Save to save your work on the Rubric and then Save again to save your (assignment, test, or discussion) settings.
Associate a Rubric with a Gradable Item
Once you have created a rubric, you can associate it with as many gradable items as you wish. You can do this the first time you create the gradable item or you can add it later by editing the gradable item.
Note: in Blackboard Ultra, unlike Classic, you can only associate a rubric with an assignment, a test with no questions, or a discussion. The process for each gradable item is the same.
In the pop-out Settings window (Assignment Settings, Test Settings, or Discussion Settings)...

...scroll almost all the way down to Additional Tools. Click Add grading rubric.

This will open an additional pop-out window showing all of your rubrics saved within the course.

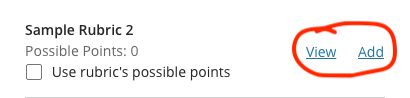
You can preview the contents of each rubric before you select one by clicking the blue View link.
Once you’ve chosen, click the blue Add link.
Click Save on the Settings page.

That rubric is now connected to your assignment, a test with no questions, or a discussion.
Additional options (see other articles about these items):
• Detach the rubric from this item (it will not delete it from the course as a whole).
• Edit or duplicate the rubric.
Edit Rubric
Just as there are two ways to initiate creation of a rubric, there are two ways to edit rubrics.
Note: changes you make to a rubric will be reflected everywhere that rubric is associated. You CANNOT, however, change a rubric which has already been used to grade a submission.
Edit a rubric without an associated gradable item.
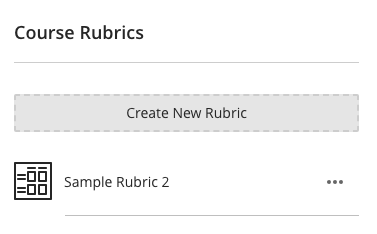
From the Gradebook screen, access the settings by clicking the gear icon in the upper right.
Scroll all the way down. Below the heading Course Rubrics will be a button to Create New Rubric and then a list of the existing rubrics.
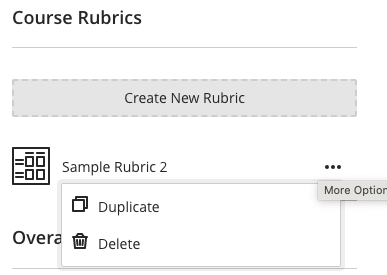
From here you can do all of the following with your rubrics:
- Open and Edit by clicking on the title of the rubric
- Duplicate by clicking the three gray dots on the right.
- Delete by clicking the three gray dots on the right. (Cannot delete rubric if it is attached to an active gradable item like an assignment.)
Be sure to Save your work before exiting the screen.
Edit a new rubric from within an associated gradable item.
From within an assignment, test with no questions, or discussion, you can edit a rubric.
Access the (assignment, test, discussion) settings by clicking the gear icon in the upper right.
Scroll almost all the way down to Additional Tools. Find the rubric you wish to edit. Click the title of the rubric (a blue link).
This will open a pop-out window where you can edit your rubric.
Be sure to click Save to save your work on the Rubric and then Save again to save your assignment settings.
Grade Assignment with a Rubric
Unlike the Classic version of Blackboard, grading with a rubric in Ultra is the same for assignments, tests with no questions, and discussions.
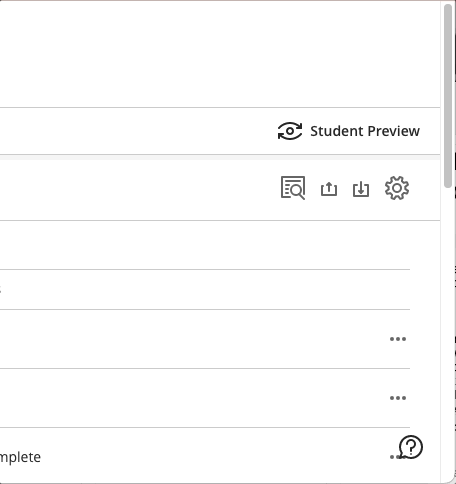
Clicking the grading pill on student Submission page will route you to the rubric grading for the item in question. You'll find the grading pill in the upper right. When an item has rubric grading enabled, the pill will have a table / rubric icon before the score display.
For Discussion and Journal assignments, this will open a rubric side-panel. For standard assignments, this will expand the rubric details section of the grading side panel.
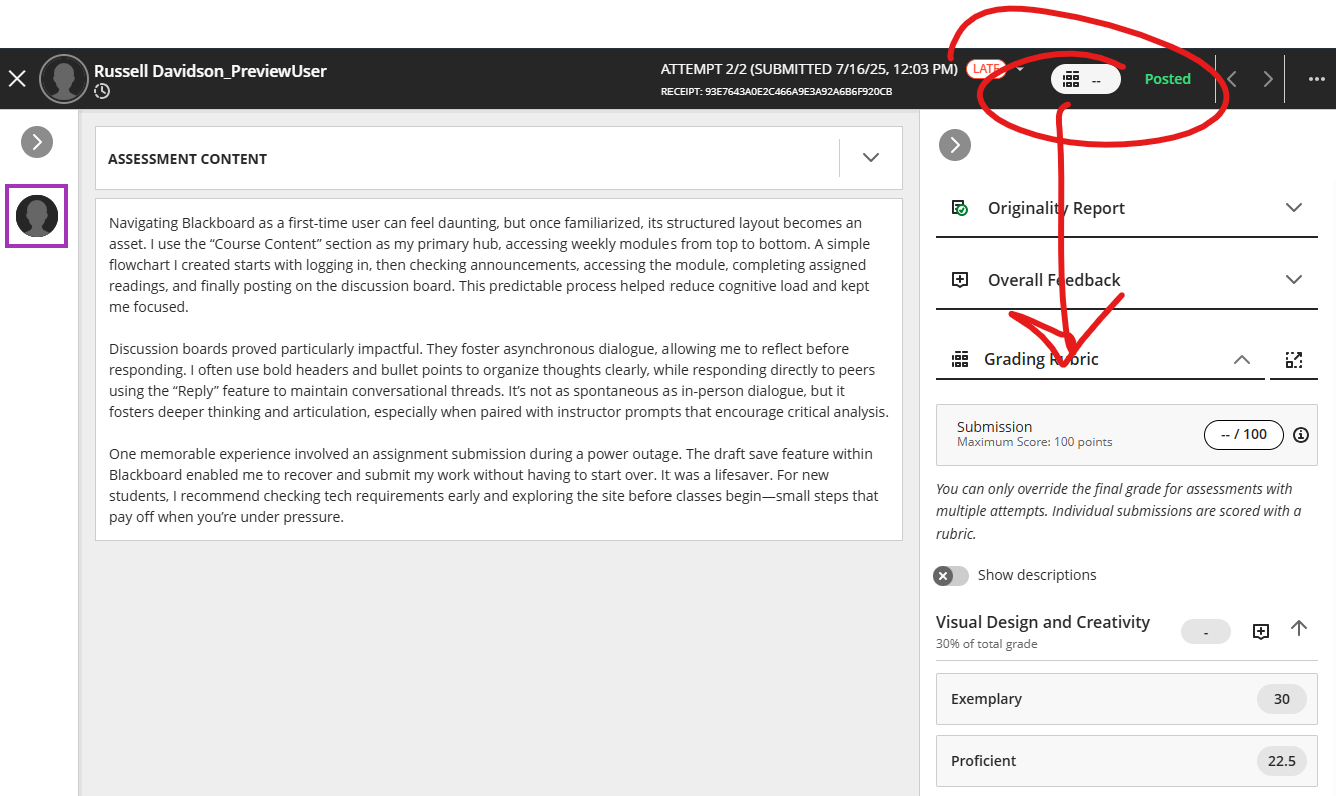
By default, rubric descriptions are not visible. To view the rubric descriptions, click the SHOW DESCRIPTIONS toggle.
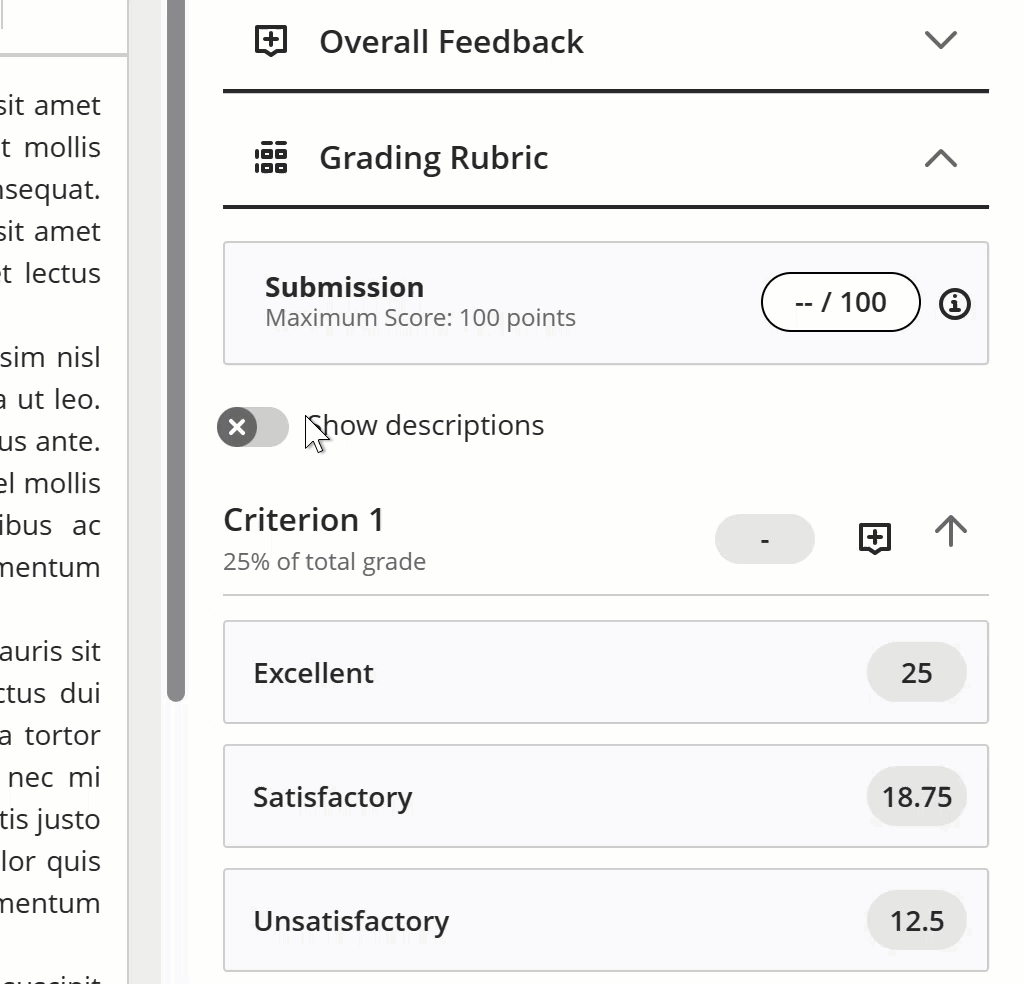
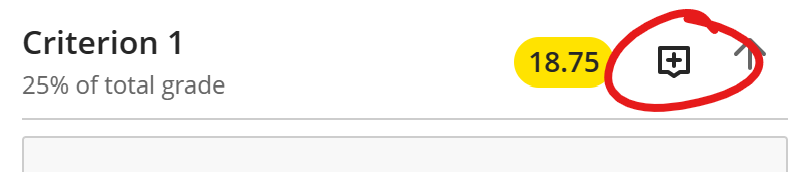
To score using the rubric, you need only click the rating-scale box for each criterion. The score will automatically be applied to the student's grade. You can click the up-pointing arrow on the criterion heading to collapse the graded criteria (meaning less scrolling to get to the next criterion).
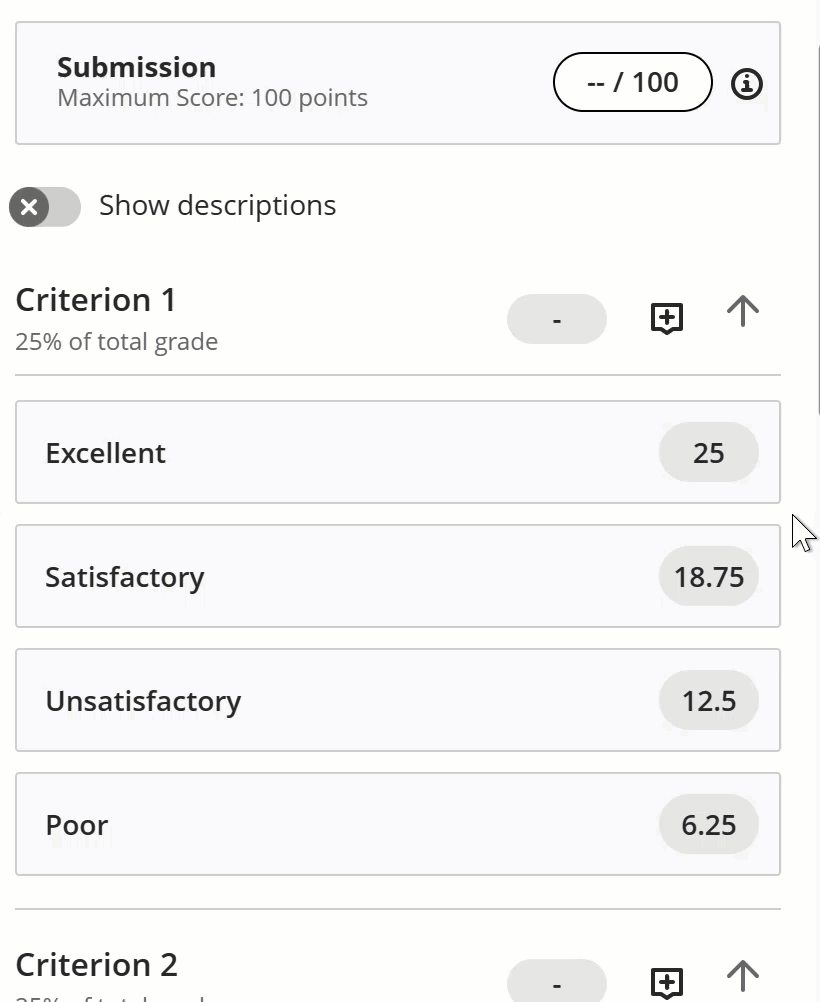
Click the COMMENT button on the criterion heading to open a space for providing the student with feedback on their performance on that particular criterion.
Your work will be saved automatically as you exit the page.