Batch enrolling groups can be extremely helpful when managing large numbers of groups and students. This page outlines all the steps involved in creating a group set, creating all the groups you'll need within that set, exporting that group set so that you can get the group codes, creating the batch enroll file using those group codes, then using that batch enroll file to populate your groups.
The first step will be to create a Manual Enroll Group set.
Add a Group Set
The process of creating groups in Blackboard begins by creating a group set, even if you're creating a single group.
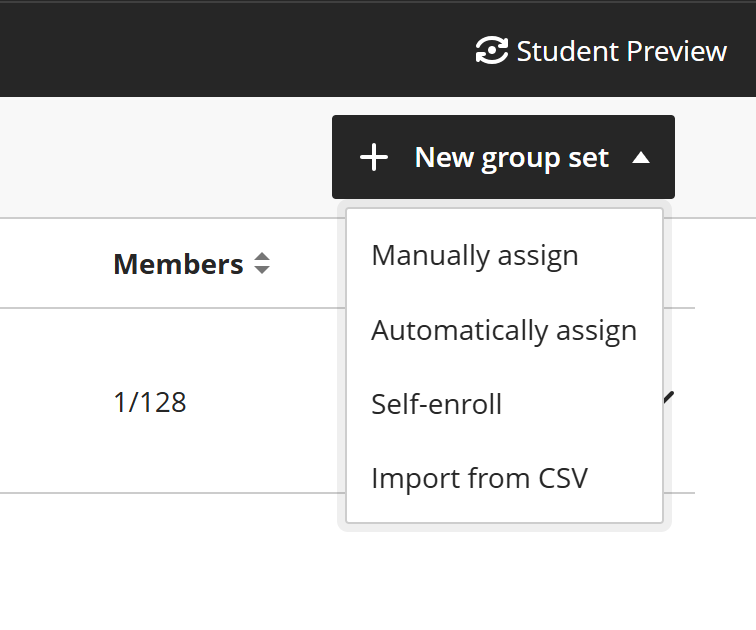
You'll choose an enrollment style for the groups:
Manually Assign if you'll be enrolling students yourself.
Automatically Assign if you want Blackboard to randomize the groups.
Self-Enroll if the students will be adding themselves.
Import from CSV if you have a set of groups in an appropriately formatted comma separated values (CSV) file that you'll be using to create groups.
To set this up, go to your course's Groups tab and click the NEW GROUP SET button in the upper right. Then choose your enrollment style.
The Manually Assign Groups page covers settings and properties that to all groups and is most broadly useful.
The Self-Enroll Groups page covers the first step when creating a Self-Enroll Group set.
The Automatically Assign Groups page covers the first step when creating a Automatically Assign Group set.
Add Groups to a Group Set
Next, you'll want to add groups within the set.
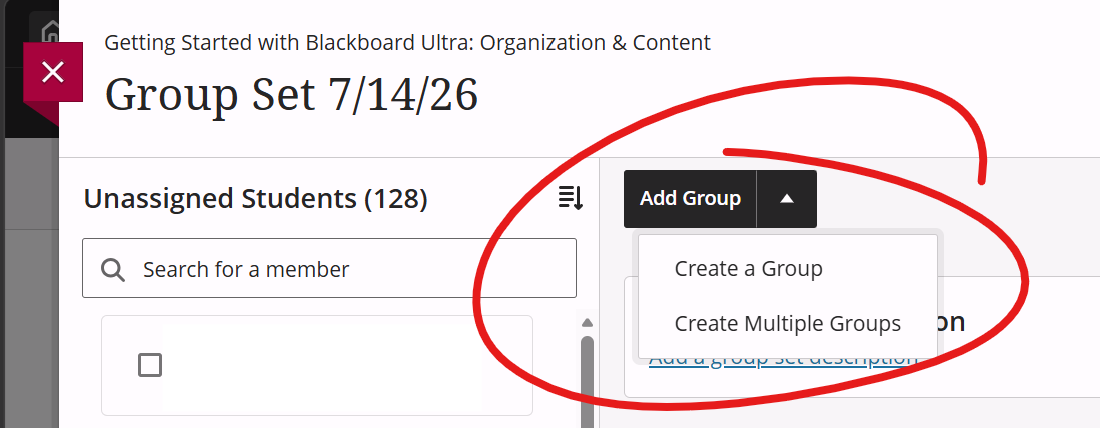
You can either add each group individually and name them as you add them or add a number of groups at once and name them afterward.
To add groups to the set, click the ADD GROUP button in the top-middle. You can add a single group, in which case you'll be prompted to enter a group name and description, or you can add multiple groups, in which case you'll be prompted to enter the number of groups you wish to add. If you add multiple groups, they'll be named "Group 1", "Group 2", etc.
Edit a Group Name and Description
If you chose to add the groups in a batch, the next step is to rename the generic groups to something that will be clearer to students.
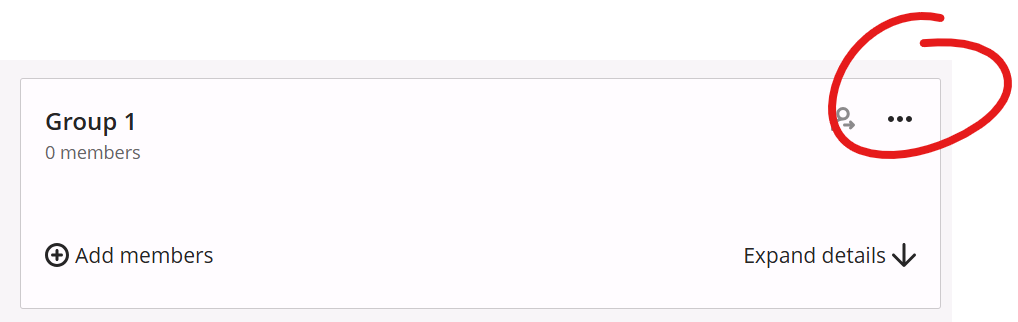
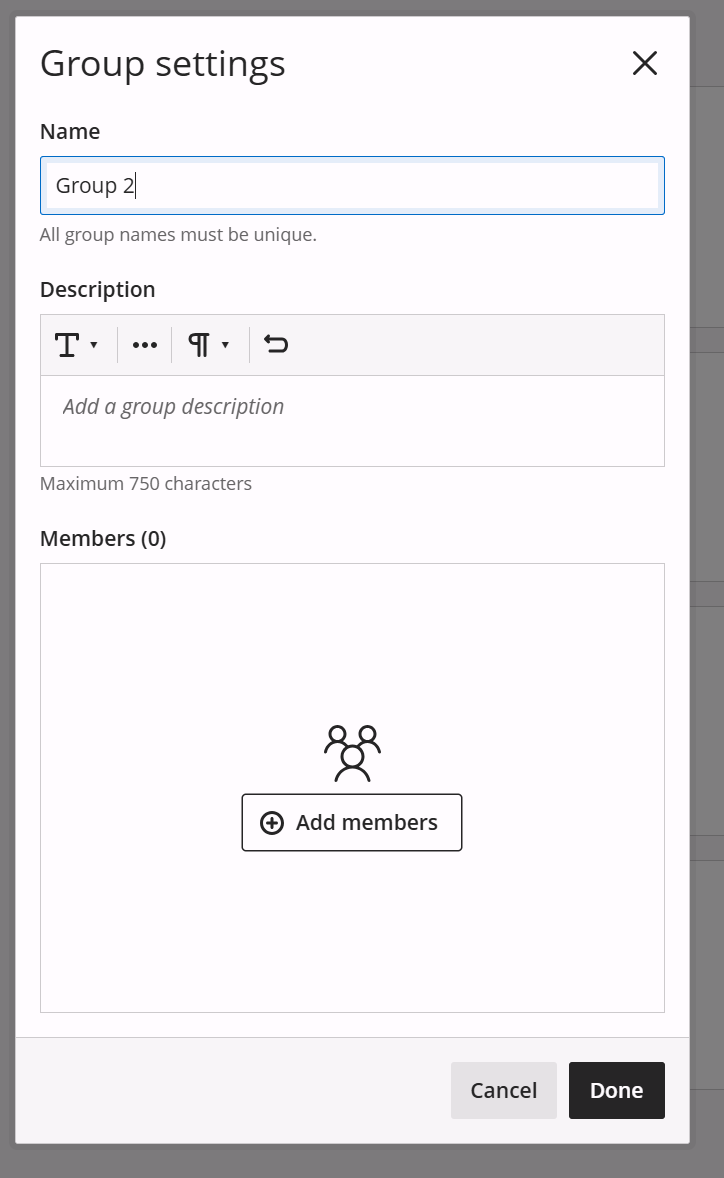
To enter or edit a group name and / or description, click the "..." button in the top right of the group box, then choose GROUP SETTINGS.
This will open an overlay window where you can enter or edit the group name and description. You can also click the ADD MEMBERS button to add folks to the group.
Export Groups
Next, you need to export the group set. This is how you get the group code for each group, which you'll need to create the group enrollment csv.
Blackboard's group tool lets you export groups and/or group membership as a comma separated values (csv) file. While this file does not contain the work and activities of the group -- it does not include groups' discussion, for example -- this information can be useful for keeping an external record of who was a member of which group.
More importantly, the "group sets only" option provides you with Blackboard's unique group identifier code, which can be used along with Blackboard's Group Import tool to batch enroll course groups.
To export group information, navigate to your course's GROUPS page.
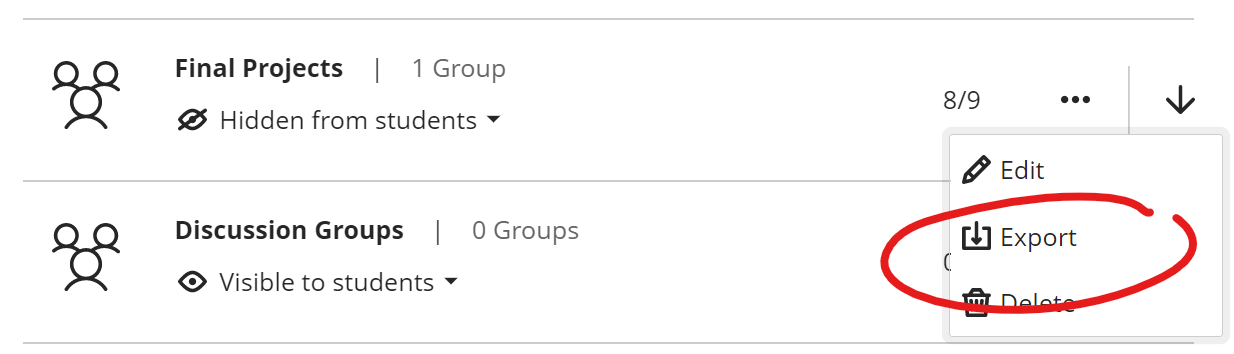
Click the "..." button right of the group set you wish to export data for, then choose EXPORT.
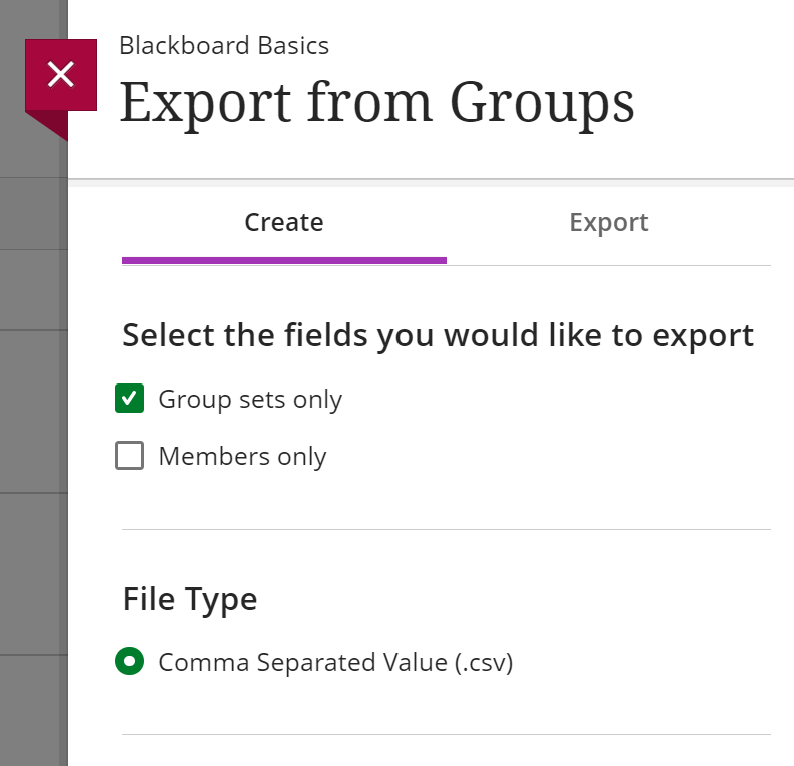
On the export panel, which opens on the right, select the fields you wish to export. If you are planning on batch-enrolling groups, you'll want to choose "Group sets only"
Click EXPORT FILE at the bottom of the page to start the export processing. You will receive an email when your export file has been generated.
To download the Export file, reopen the Export from Groups panel (as above, select the group set from the groups list, choose Export).
Click EXPORT at the top of the Export from Groups panel.
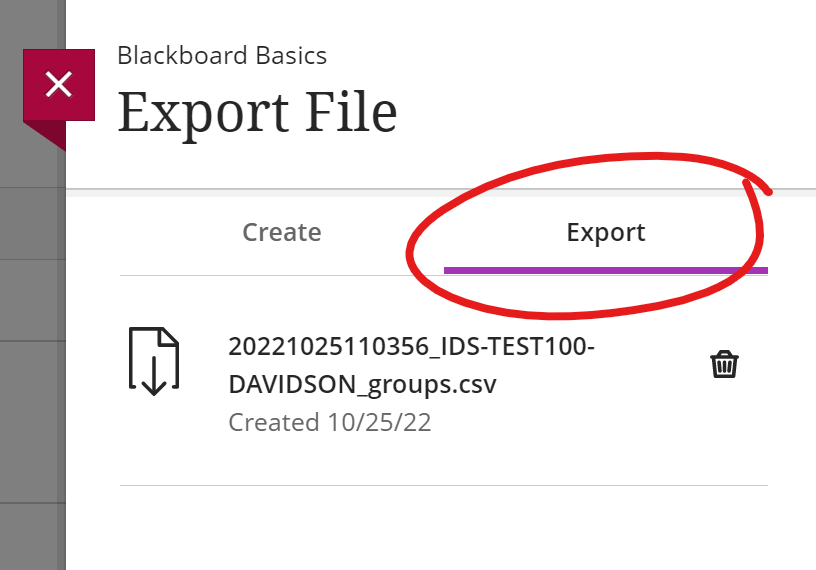
Click the export file and you will be prompted to open or download the csv file. Choose Download to save the file to your computer
Create Group Assignment Batch File
Using information in the exported Group Set file, create the Batch Enroll file.
To batch assign students to a group you'll need to create a comma separated values (csv) file. This can be created from scratch in Excel, but it will be easier to start with course groups csv exported from Blackboard.
Your batch assign file should consist of two columns. The first should be labelled Group Code. This column will contain the unique identifiers for the groups you wish to batch add students to. This information is best collected via export (linked above).
The second column should be labelled User Name. This column will consist of the usernames of the course members you wish to add to each group. Usernames are the first part of a person's email address.
You can get this information for your students from the ultra-style course ROSTER page or the classic-style course USERS page.
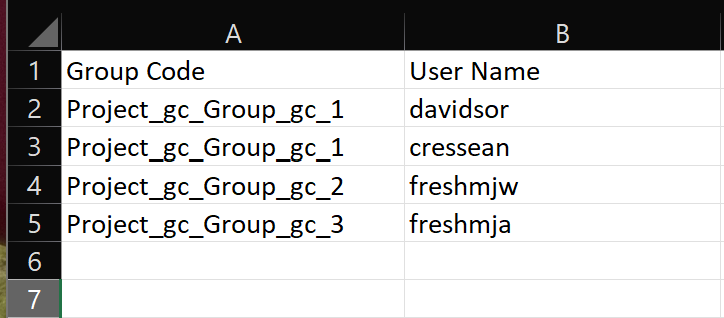
Each line should have a GROUP CODE and a USER NAME.
To enroll more than one student in a group, repeat the GROUP CODE for each user. In the example above, davidsor and cressean are both being enrolled in the same group (Project Group 1 or Project_gc_Group_gc_1).
Save this file from Excel as a CSV. You can then import it into your groups page.
Batch Assign Users to Groups
Finally, you can Batch Assign members to their groups
Once you have a Group Assignment Batch csv, navigate to your course's Groups page.
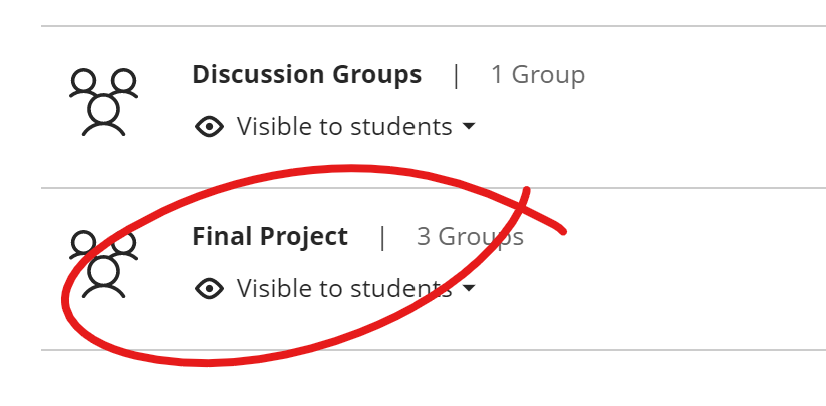
Click on the name of the group you wish to batch import users into.
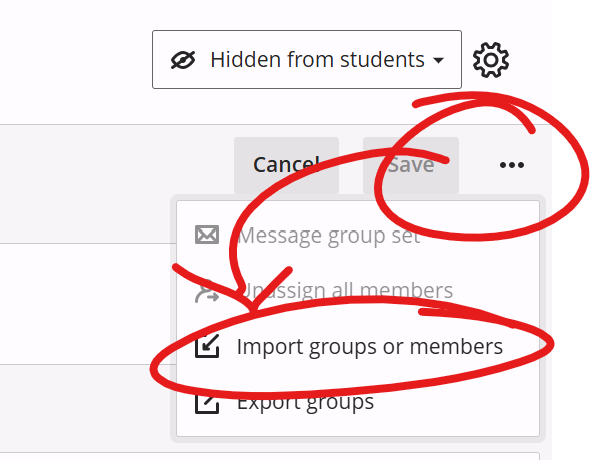
At the top-right of the Group Set page (just below the GEAR icon), click the "..." button. Choose IMPORT GROUPS OR MEMBERS
On the IMPORT GROUPS OR MEMBERS panel that opens on the right, select the ASSIGN MEMBERS tab, then click the UPLOAD FILE button and browse for your batch csv.
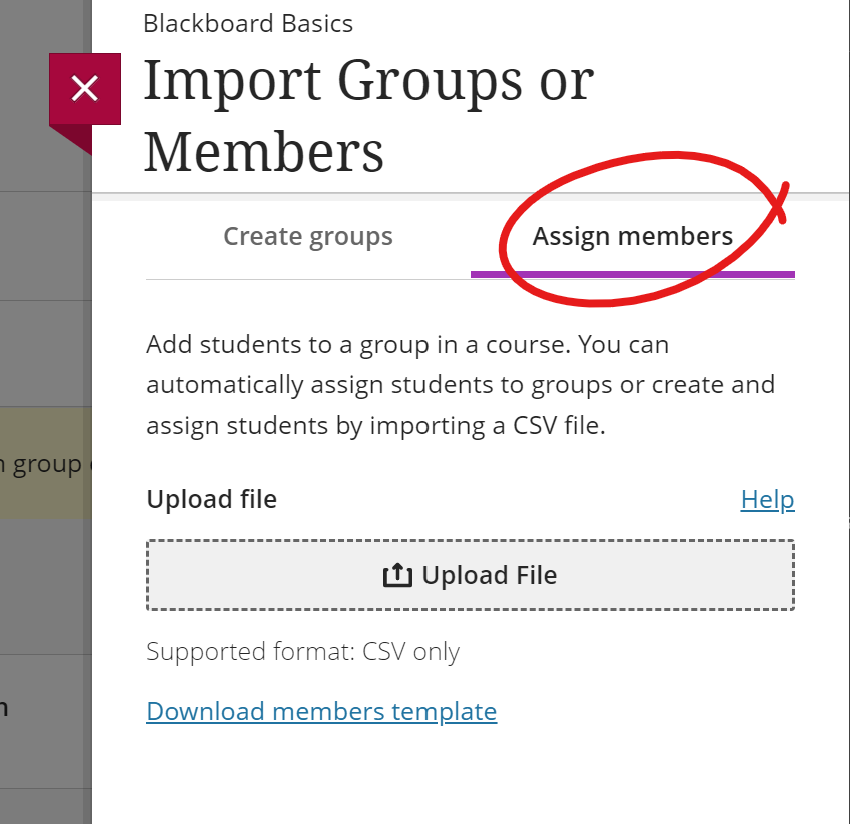
Click IMPORT at the bottom of the panel to start the import process. You will receive an email when the import has completed.