By Russell Davidson, Associate Director for Digital Education
Blackboard has introduced an array of AI-assisted tools to enhance ultra-style course sites. If you have utilized the stock image search to add a course banner following our February 2024 newsletter, you have already interacted with one of these AI features, as the default image search keywords are AI-generated. Now, we have access to even more AI tools that can generate images, learning modules, test questions, rubrics, assignments, and prompts for journals and discussions.
If you are eager to experiment and have access to an ultra-style course, you can try these features now. Simply look for the “Auto-generate” option in your course menu list or a black “Auto-generate” button at the top of your discussion, journal, or assignment page (shown in the graphic posted above and to the right.
Our primary recommendation is to use these tools wisely. Treat the generated content as a source of inspiration and scrutinize it for accuracy and relevance. Leverage your expertise in the course content and your understanding of your students’ needs to refine the generated content into a more targeted and useful resource. AI-generated content should be approached with the same caution as a Wikipedia article or any other online content – it may be accurate and useful or it may be inaccurate or misinterpreted.
Second, keep in mind that these tools are only available in ultra-style courses. If you wish to give them a try but still prefer to use the older-style course sites or if you want to experiment without affecting a site with active or future students, email ask-CETL@udmercy.edu to ask for a development site. We would be happy to set up a sandbox site for your experimentation.
Generate a Rubric in Ultra-Style Courses
To get started generating a rubric, locate the Rubrics page. This can be accessed by opening the settings side panel on any gradable item in Blackboard and scrolling down to the RUBRICS heading. CETL has created a guide for creating a rubric in ultra-style courses, which can be found here.
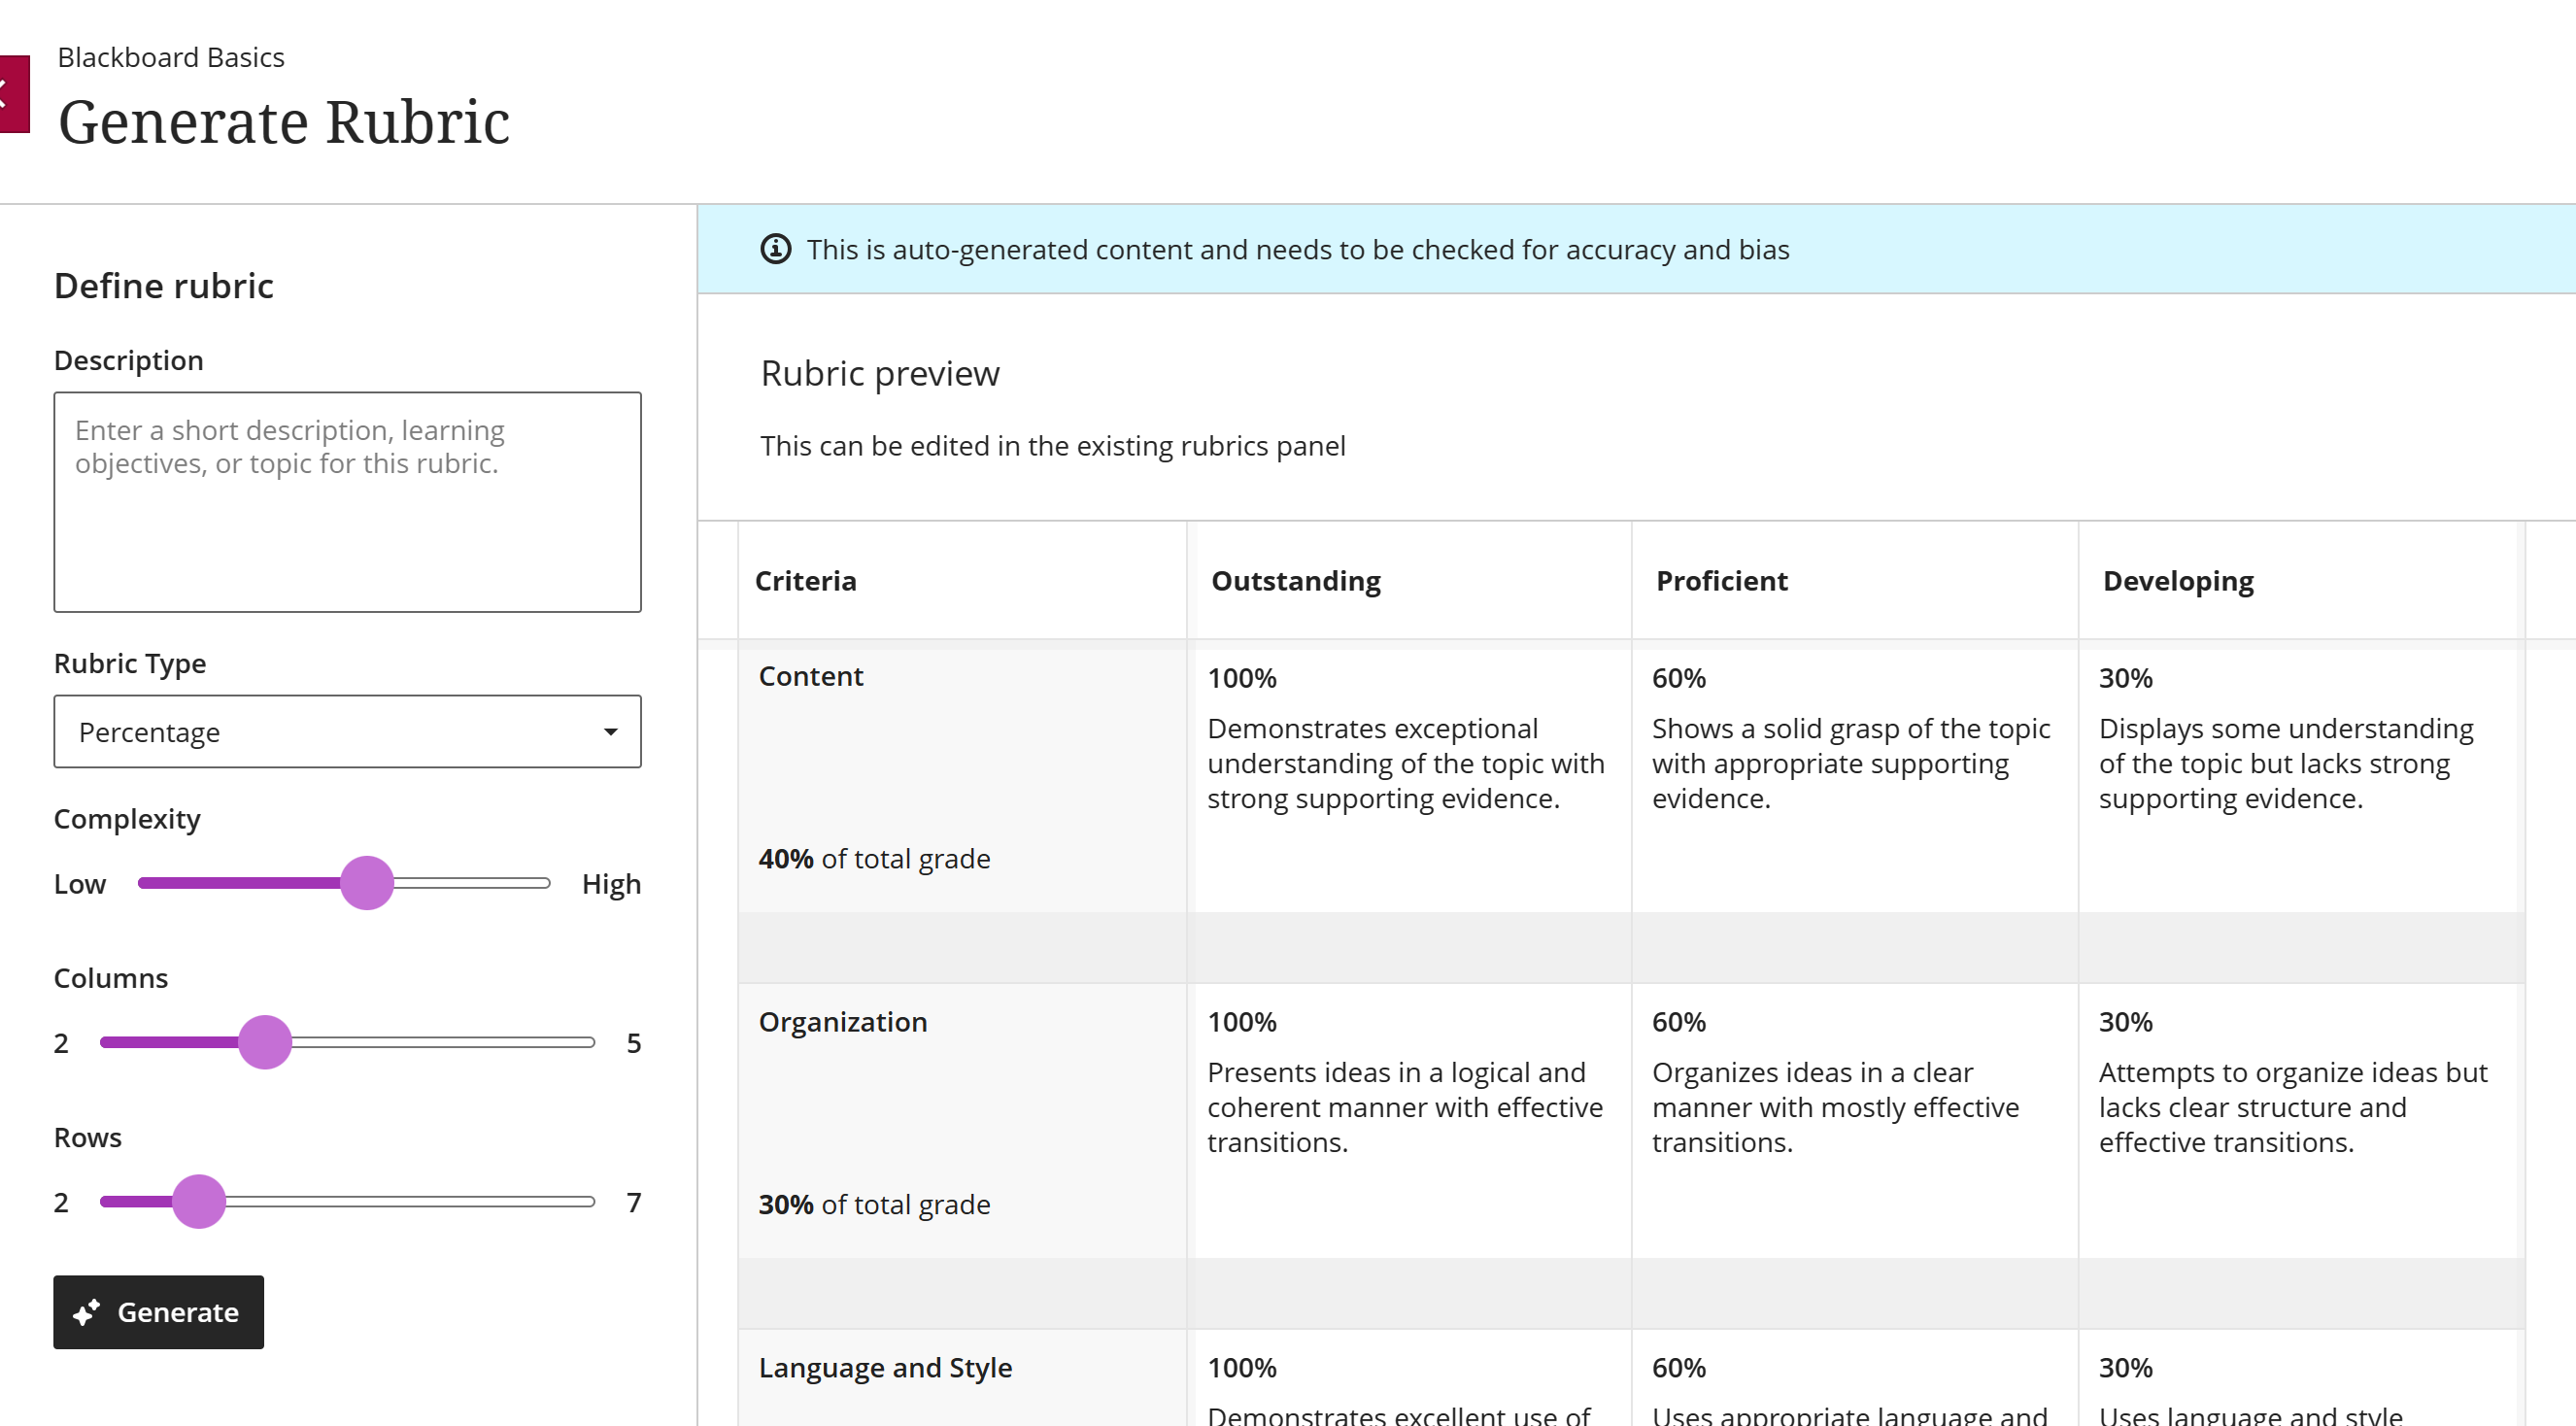
On the Add Grading Rubric panel, you will now see a Generate button along with the Create button. Clicking Generate leads you to a rubric creation page with some default-generated content.
The real power of the tool is found in the Define Rubric panel on the left. Here, you can set the Rubric Type (e.g., does it score using percentage, percentage range, points, or point range) and the number of rows and columns. The Complexity slider adjusts the “depth” of each criterion. The Description field is the most interesting bit. Here, you can enter a description of the assignment, learning objectives, and/or a topic for the rubric (to a limit of 2000 characters). When you click Generate at the bottom of the rubric, you will get a more fully fleshed-out rubric based on your selections in this panel.

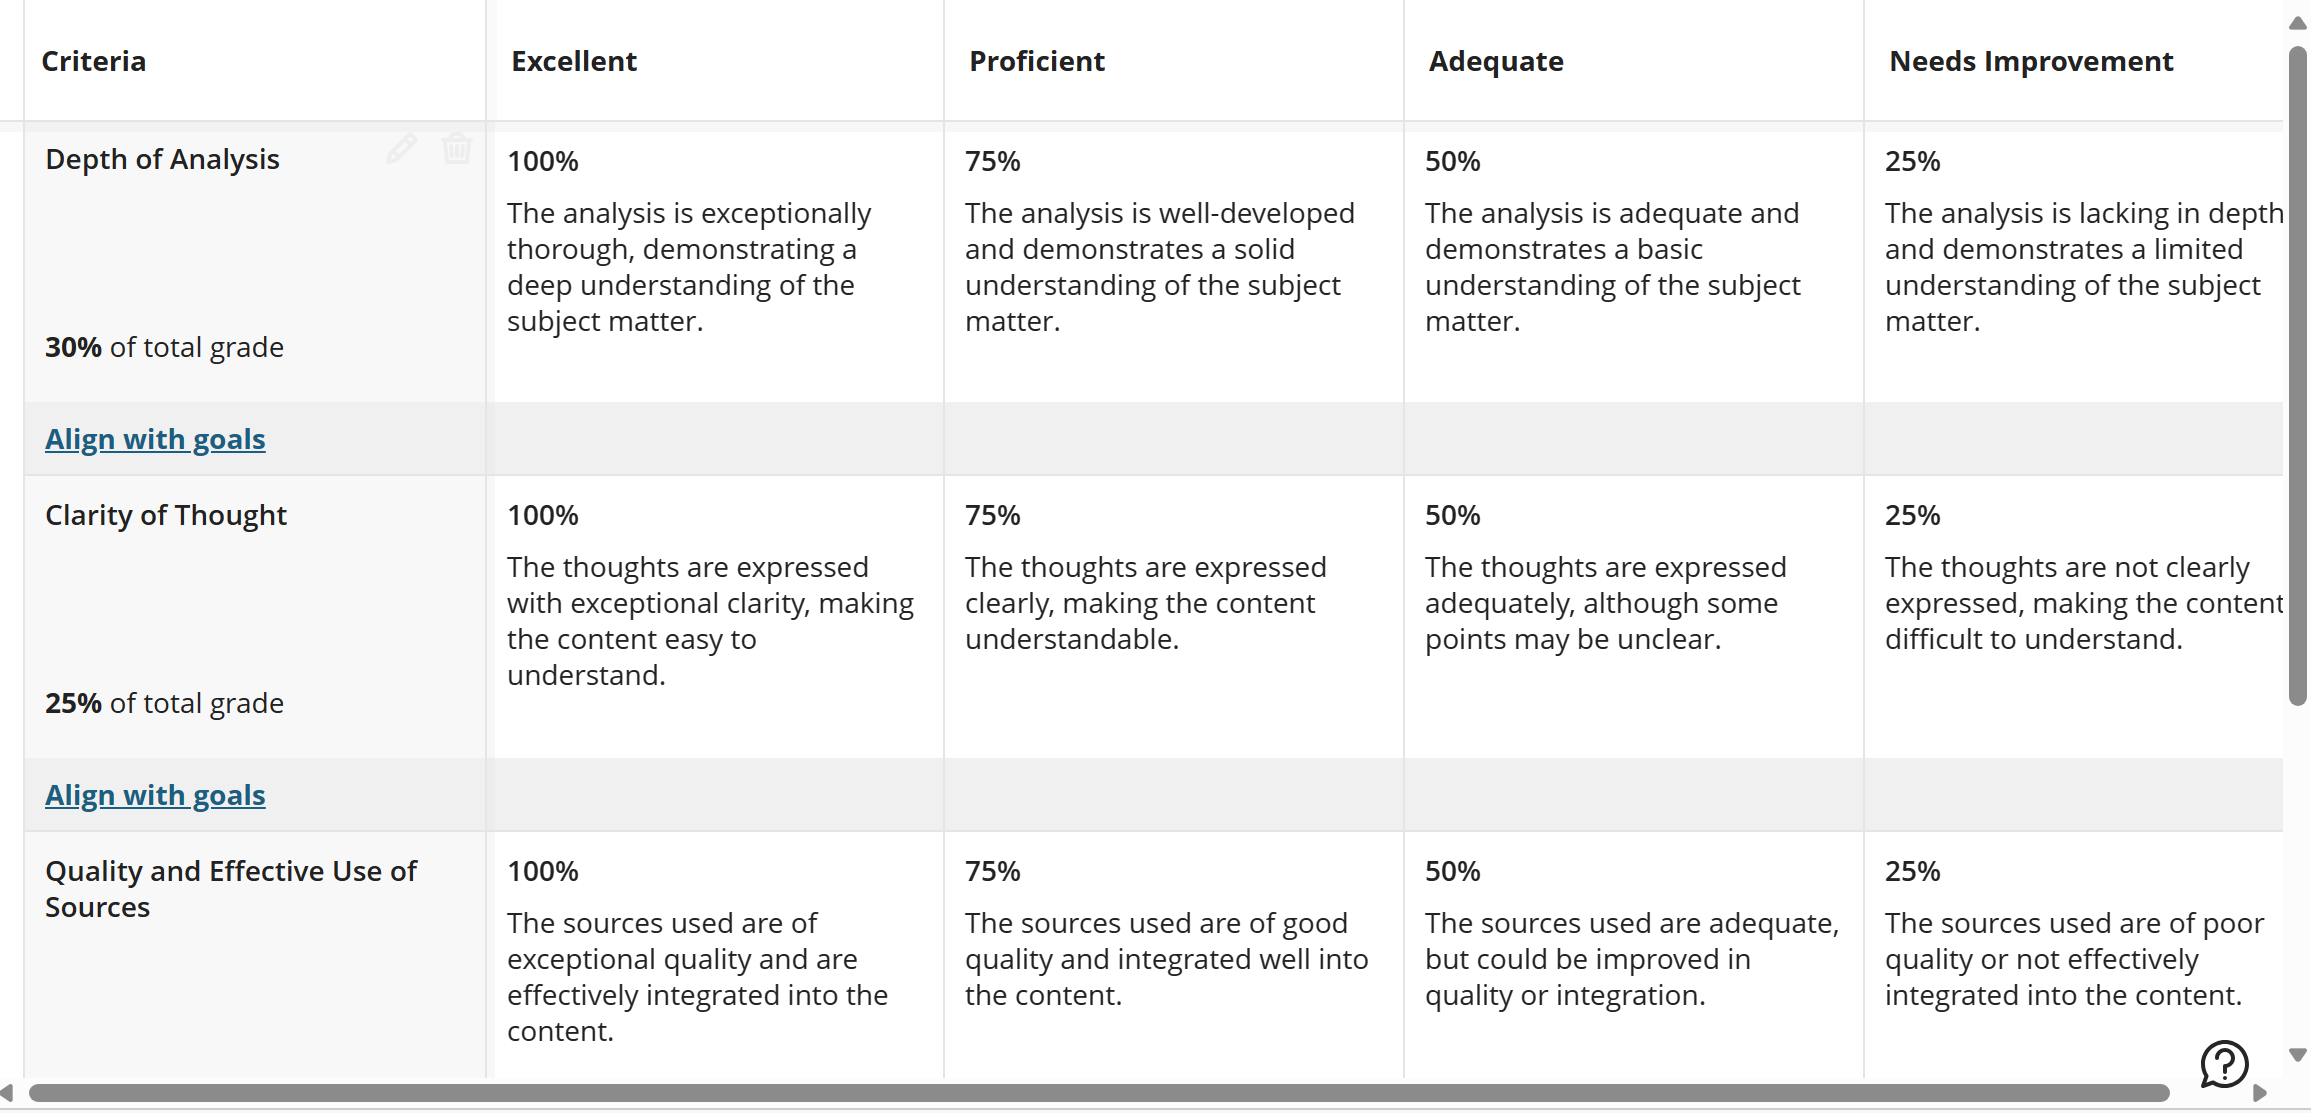
For example, when the following is entered into the Description field:
“Grade will be based on adherence to APA style; quality and effective use of at least 3 sources; depth of analysis; clarity of thought.”
— then set the rows and columns to 4 and click Generate criterion rows labeled “Depth of Analysis,” “Clarity of Thought,” “Quality and Effective Use of Sources,” and “Adherence to APA style” are produced. Each criterion contains a description of what may qualify for each particular level of performance (these criteria can be modified to suit the specifics of the course and assignment).

As one might expect, playing with these settings and re-generating produces different results. Be aware, though, that every click of the Generate button yields slightly different results, even with the settings remaining unchanged. Therefore, when the results are mostly satisfactory, click Continue to exit the generator and proceed to the editor (or make some notes before clicking Generate again). Also, note that the order of the items in your description affects the generated rubric, altering both the order of the rows and their relative value.
Once the rubric represents a good starting point, click CONTINUE. This exits the Generator and puts you into the rubric editor. On this page, you can edit any part of the generated rubric — labels, descriptions, point values (or percentages) for each cell in the rubric table — refining them to suit the specific needs of the assessment in question. Again, refer to the CETL page on rubric creation for the specifics on rubric editing, if necessary.